Monday, February 28, 2011

Ice Cream Parlor {butterflies!}

Hi all!  I made more of the fun butterfly easel cards for a demo swap I had this weekend.  These are so fun and easy to make!  The instructions to these cute little guys are one of many awesome projects with detailed PDF instructions that are available from the UStampWithDawn Oh My Word issue that you can find here.  It's definitely worth checking out - Dawn's got a sneak peek of what you can expect on the site so you can get a feel of what you'll be seeing :)

I've got a couple more pics of these cute little Ice Cream parlor butterflies.  Isn't the dsp cute?  There are also 2 sheets f self adhesive coordinating little shapes and borders as part of this Sale-a-bration DSP set, too.

Hope you like them!  Have a great day..need to get back to doing some household chores {ugh!! not so fun, but a necessary evil - heehee!}  Enjoy the rest of your evening and come back and visit tomorrow for this week's Hand Stamped Sentiment challenge!

Bye for now!


Sunday, February 27, 2011

Petal Cone Punch Bunch Birthday!

Hi all - Happy Sunday!  Hope you guys are enjoying your weekend so far.  Any plans for Oscar night?  I'm hoping to catch some of it, but personally, I think the best part is the red carpet before the event!  Anyone else with me on that?  As for best movie, I'm rooting for The King's Speech.  I just saw that movie and I really enjoyed it!

Anyway, for today, I've got a fun share for you - I made a Petal Cone favor and I'm so happy with how it came out!  I used the Punch Bunch owl, and gave him googly eyes, which I think makes him look so wide eyed and fun :)  Here's a look at the full favor:
I used the Ice Cream Parlor DSP and I really do like all the bright and happy colors.  Here's a look at the top of the Petal Cone.  The half scallop circle edging gives the top of the cone such a nice finish.  To secure this cute little favor, I punched 2 holes at the top and threaded the Pear Pizzaz seam binding ribbon.
And here's a look at the whole favor - so cute when it's hanging!
I punched out the birthday sentiment from the Punch Bunch set with the scallop square, and added a little paper ribbon trim that was die cut from the Petal Cone.  What do you think?  Would love to hear your feedback.  Now, how cute is that Punch Bunch Stamp Set?  It's one of the Sale-a-bration sets you can earn for FREE when you place an order of $50 or more.  In fact, you can earn a free Sale-a-bration product with every $50 purchase.  You can check out more at my online store.  Don't miss out on Sale-a-bration!! How about the recipe for this petal cone favor?:
{Petal Cone Punch Bunch}
*Stamp Set: Punch Bunch
*Cardstock: Melon Mambo, Baja Breeze, Whisper White, Ice Cream Parlor DSP, Old Olive
*Inks: Melon Mambo, Peach Parfait,Crumb Cake Classic Ink Pads; Daffodil Delight Marker
*Accessories: Petal Cone Bigz L Die, Extra Large Owl Punch, Scallop Square Punch, 2 1/2" Circle Punch, 2 3/8" Scallop Circle Punch, Build a Cupcake Punch, Linen Thread, Pear Pizzazz Seam Binding ribbon, Sweet Stitches Designer Buttons, Crop-a-dile, Itty Bitty Punches flower {for the eyes}, Brads, dimensionals, Snail adhesive; googly eyes {non-SU!}
Hope you like it!  Thanks for visiting and enjoy the rest of your day :)  Ciao for now!


Saturday, February 26, 2011

So grateful for awards!

Hi all!  Hope you're enjoying your weekend.  Today's post is sooo long overdue.  I am really so grateful to Jinny, Patty B., Patti C., Gilda, Rebecca, Mimi, Monika, Melissa, and Margaret for giving me the Stylish Blogger Award...and my apologies for taking so long to post!  I want to thank Olga, too for the Sweet Blogger Award months ago...very sweet of you!!

It's not that I didn't want to post...I am truly soo thrilled to have gotten this recognition!!  It's that I have been so strapped for time to create and post that this would get pushed back on the list for me.  So, I hope you guys forgive me. :) With the Stylish Blogger award, I'm also supposed to share 8 things about me and then pick 8 fabbie blogger to send this to...it's such a tough decision as I really LOVE sooo many blogs out there.  So without further adieu...

8 things about me:
1.  My astrological sign is a Cancer.
2.  I am 5'1" tall {or short, as is the case}
3.  I love watching Top Chef.
4.  I work full time at a large internet company doing Marketing.
5.  I started stamping in 2000 and have been hooked ever since!
6.  My favorite vacation spot of all time is Kauai {feels like a 2nd home!}.
7.  My favorite ice cream is Jamoca Almond Fudge {or a variation thereof}.
8.  I love to shop for shoes and purses :)

8 Fabbie Bloggers that inspire me - here they are in alphabetical order:
Bronwyn Eastley
Erica Cerwin
Jenn Picard
Marika Lemay
Melanie Schulenberg
Regina Mangum
Sam
Steph D.

I encourage you to check out their amazing blogs!  Hope you all have a fantastic day!!  xoxo


Friday, February 25, 2011

February Final Friday Winner!!

Hello there bloggie friends!  It's the final Friday of the month, so that means it's time to announce this month's lucky winner!!  I am happy to share that the February Final Friday Giveaway winner is....
Lucky number 41, who happens to be
Catherine Dewaal!

Congratulations to you, Catherine!

Thank you all for playing along this month and leaving me fun comments.  You guys are awesome!  Hope you enjoy your Friday and I'll catch up with you guys in a bit!
Toodles for now :)


Tuesday, February 22, 2011

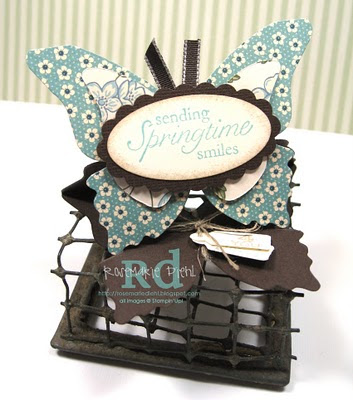
Springtime Butterfly {to die for!} for this week's HSS Challege 56

Hello there, blog friends!  Did you have a nice President's day weekend?  Hope so.  I have to say it was great to have a 3 day weekend to catch my breath for a quick second.  It has been soo busy busy for me behind the scenes!  Thankfully, I had some down time to do some crafting and got to make this fun card for this week's Hand Stamped Sentiment's Challenge 56, which is to create a card using a die cut:
I got the idea for this cute butterfly easel card from Bronwyn Eastley and I had to give it a try!  Here's a couple more pics for you:
This little easel card fits in a 3x3 envelope, so it makes a sweet little note to give to someone to brighten their day!  I used the Easter Blossoms stamp set to stamp the sentiment on the butterfly, and used the pretty blossom branch to stamp the envelope flap.
One last look for you - I tied the tiny tags in the inside of the butterfly card with the linen thread.  What do you think?  I really like the color palette and the dainty little flowers on the Springtime Vintage DSP add that soft vintagey feel.  Hope you like it!  Here's the recipe for you:

{Springtime Butterfly}
*Stamp Sets: Easter Blossoms, Tiny Tags
*Cardstock: Textured Early Espresso, Very Vanilla, Springtime Vintage DSP
*Inks: Baja Breeze, Crumb Cake
*Accessories: Beautiful Butterflies Bigz die, Scallop Oval Punch, Large Oval Punch, Jewelry Tag Medium, 1/8" circle punch, Linen Thread, 1/8" Early Espresso Taffeta Ribbon, 3x3 envelopes
Now, I'd love it if you guys played along with us this week!  How about giving it a whirl?  Would love to see the cards or projects you come up with using dies!  There are so many possibilities!!  Hop on over to Hand Stamped Sentiments and check out the creative inspiration from the awesome design team!


Saturday, February 19, 2011

rosette desk calendar

Hey there blog friends!  Yay - I'm so glad it's Saturday.  The weather's gotten chilly here again in Southern CA.  Seems like it's back to winter!  Well, I can't believe we're more than half way thru February already.  Today's post is a great little project that'll help you keep track of the days - isn't this cute? I embellished this calendar with the rosette I posted in the tutorial here. This is such a quick and easy gift to make, I think you'll like it!  I got the idea for this size of calendar from Sandy Hancock.  This is just my take.  Want directions?

Here you go:

{rosette calendar}
1. Score an 8 1/2" x 4 1/4" piece of cardstock at 2 1/8" and 4 1/4".  Fold at the score lines
2. Stamp the flourish from the Bliss stamp set on the front flap (this is the side that has the 2 1/8" scoreline}
3. On the inside, layer a piece of 4" x 4" DSP.
4. Embellish the front flap with the rosette.  I used the leaves from the Extra Large 2 Step Bird Punch and the Build a Blossom punch.  Adhere the rosettes and leaves with mini glue dots and/or dimensionals.
5. Use linen thread to thread the holes of the button, then adhere to base of calendar using a glue dot.
6. Adhere the calendar in the right corner of the base.  Viola!  You're done!

Hope you enjoyed that project!  Have a great President's day weekend!  Bye for now! :)


Friday, February 18, 2011

Scallop Rosette Tutorial!

Hi all!  Happy Friday to you.  Many of you had asked me about instructions on the flower rosette I created on this card, and I'm happy to say, I've finally gotten the chance to put it together for you!  Here it is:

Supplies:
2 3/8" Scallop Circle Punch
Paper Snips
Your choice of DSP
Tombow Multi Purpose Glue
Bone Folder
Glue Dots

Instructions:
1.  Punch out 6 scallop circles, then make the following cuts on each:
-cut one from the edge to the center of the circle
-then on the remaining scallop circles, do the following: cut a 2 scallop pie sliver, 3 scallop pie sliver, 5 scallop pie sliver, 6 scallop pie sliver, and lastly, cut a 7 scallop pie sliver (basically cutting the circle in half).  See picture below.
2. Use the bone folder to curl each of the pieces:
 3. Apply the Tombow glue along one edge of each of the scallop circle pieces and create a "cone shape" with each piece:


4.  Cut about 1/4" off the bottom of each cone - this will allow each of the flower layers to better nest and create a full flower.

5.  Now that you have all your layers created, all you need to do is assemble the flower by nesting time together!  To add some texture, first nest all the layers together and then place the flower in your palm  and crumple in your hand.  Then when you're happy with how your flower looks, all you need to do is use glue dots at the base of each flower and adhere to each layer.  Start from smallest to largest.  Your finished flower will look something like this:
 
Now it's your turn!  Have fun creating these flowers!!!  Thanks for popping in!


Tuesday, February 15, 2011

pocket full of Birthday Wishes for HSS #55


Hi all!  Did you guys have a nice Valentine's Day?  Hope so.  Today, we've got this week's Hand Stamped Sentiments Challenge - a fun pocket sketch card.  I made my card using one of my favorite color palettes - pink and green.  In this case, I used Pink Pirouette, Melon Mambo, and Old Olive.  Wanna see the sketch for this week?
You can substitute the pocket with any shape you'd like to use.  For my pocket, I chose half of a Top Note die.  I love the curvy top note shape, so it made just the type of pocket I was going for.  I added the fun felt flower, which I die cut using the Blossom Party Originals die cut.  I love these flowers!  And, of course,  let's not forget the fun Pom Pom embellishment - so pretty and fun!  I also used the sweet little Basic Pearls to embellish my scallop border framing my sentiment.  Isn't that Birthday Sentiment font so cute?  It's from the Bring on the Cake stamp set, which is chock full of Birthday wishes!
How do you like the card?  Would love to hear from you and get your feedback!  Here's the recipe for you:
{pocket full of Birthday Wishes}
*Stamp Set: Bring on the Cake
*Cardstock: Old Olive, Pink Pirouette, Melon Mambo, Whisper White, Very Vanilla, Jolly Holiday DSP
*Inks: Melon Mambo
*Accessories: Top Note Bigz Die, Eyelet Border punch, Certainly Celery 1/8" grosgrain ribbon, Melon Mambo Pom Pom Trim, Blossom Party Originals Die, Subtles Buttons, Basic Pearls, Scallop Border punch, Elegant Bouquet Embossing Folder
How about playing along with us this week?  Would love to see your take on the sketch!  Just head on over to Hand Stamped Sentiments to play along.  Plus, you'll get to check out all the amazing cards from the talented design team, too!  Hope you'll play this week!


Monday, February 14, 2011

Happy Valentine's Day! xoxo


Hi all!  Wanted to pop in and wish you a HappyValentine's Day today!  Hope you guys have a great day.  Today I've got some cute  Fancy Favor Valentine bags - so easy to put together and also great packaging for some kisses or sweet treats!  Here's a few more pics for you:
Before I go, what's Valentine's day without some flowers?  Had to share these pretty flowers I got from the Farmer's Market this past weekend - they had such  great variety!  I was excited to pick some of my favorite springtime flowers and put them together - this fun vase has hydrangeas, tulips, ranunculus, hyacinths, and freesias.
Happy Valentine's Day to all of you!


Friday, February 11, 2011

a rosey hearted {Valentine}


Valentine's day is almost here...are you ready, dear bloggie friends?  I'm sure you guys are.  I just had to share another Valentine idea - this one is the very first heart bag I made with the Petal Cone.  How do you like this sneek peak so far?  I've had this project in my craft room for a few weeks now, but it just didn't seem quite finished to me, until I happened upon a card by Tara Bilbao that had these super sweet rosettes on it.  Fast forward to my project - the little rose was just the right embellishment I was looking for! Of course, I had to try the make the flower - it was way too cute to pass up. {I learned this on Tara's blog, too, so if you're reading this, Tara, thanks a bunch!} It is such a sweet bloom, don't you think?  So pretty with a touch of Dazzling Diamonds sprinkled on the edges.  I am such a FLOWER girl!  Maybe that's why my name is Rose. {hee!}
Here's a little more of the bag - now you get to see the sentiment.  Perfect greeting in such a cute font - this happens to be from the Teeny Tiny Wishes stamp set.
And here's the big picture - so cute and fun. I love this simple heart bag that you can make from the petal cone.  I even made the heart wings from the half scallop circle on the die.  Hope you like it!  Would you like the recipe?
{rosey hearted valentine}
*Stamp Set: Teeny Tiny Wishes
*Cardstock: Pretty In Pink, Whisper White, Glimmer Paper
*Inks: Real Red, Crumb Cake
*Accessories: Petal Cone die, Modern Label Punch, Jumbo Brads, Real Red Polka Dotted Grosgrain ribbon {retired}, dimensionals
Enjoy and have a fabbie weekend!  Bye for now :)


February's Final Friday Giveaway - ready to play?

Hi all!  How about this little package for February's Final Friday Giveaway?  The lucky winner will get:
*Picture This Clear Mount Stamp Set
*Bermuda Bay Polka Dot Grosgrain Ribbon
*Riding Hood Red Taffeta Ribbon
(sorry, shopping cart not included!)

Now, for the details on how to play - they're pretty simple!
Here are the rules {only enforced by the "Honor System"}:

1. Leave me a comment on this post by midnight Pacific Time, Wed, February 23, 2011.
2. On your comment, please make sure to include your first name and last initial, a valid email address or a blog URL (where I can leave a comment or have a way of contacting you). For those of you that are uncomfortable with leaving an email in a post, you can write your info like this: yourname at emailaccount dot com.
3. One comment per person please. :)
4. Anyone can play - international visitors welcome!
You can comment about anything or tell me one thing about you that you'd like to share!  I always love finding out more about you guys! ;)

Look forward to reading your comments!  Have a great day!


Thursday, February 10, 2011

polka dotted baby buggy


Hey blog friends!  Happy Thursday to you.  Hope you guys are having a great week so far.  Today, I'm sharing a card I created for a cousin's upcoming shower.  This little baby buggy was created from my die cut scraps from the petal cone!  They were the 2 half scallop circles left over from my valentine pouch project.  Isn't that so fun?  Makes me love the petal cone die THAT much more!  Here's another look:
I also had fun using my Cogs Extra Large Punch for the very first time to create my wheel centers.  I punched it out of the First Edition DSP paper, then layered it on top of a 1" circle punch and secured it with the Filigree Flower and Brad.  For the buggy, I added just a teenie bit of Pink Pirouette trim with the Dotted Scallop Border.  And for the handle, I used theSwirls Scribbles sizzlit.  Isn't that cool?  The swirl was just the right size and worked out perfectly!
For the final touches, I added the sweet little flowers from the Itty Bitty Punches and topped them off with Basic Pearls.  The stamped sentiment is from the Something To Celebrate Hostess set from the Occasions Mini, which has quickly become one of my favorite sentiment sets!  How about the recipe for you?
{Polka Dot Baby Buggy Congrats}
*Stamp Set: Something to Celebrate
*Cardstock: Crumb Cake, Love Letter DSP, First Edition DSP, Pink Pirouette, Basic Black
*Inks: Basic Black Classic Ink
*Accessories: Petal Cone Bigz L die, Cogs Extra Large Punch, 1" Circle Punch, Itty Bitty Punches, Basic Pearls, Dotted Scallop Border, Swirls Scribbles Sizzlit, Filigree Flower and Brads
Hope you like it!  Have a fab day.  Ciao for now!


Tuesday, February 8, 2011

Hand Stamped Sentiments Ribbons and Lace Challenge!

Hi blog friends!  Are you ready?  I was so excited about this week's challenge over at Hand Stamped Sentiments!  It's a ribbons and lace challenge...and I love me the ribbons, so this was lots of fun. 
As you can see, this is the 2nd of of my square crumb cake cards this week, too. {I love this 4 1/4" square sized card!} I also got to play around with a new technique (for me, that is). It's making the layered rosette flower out of scallop circles.  For a first flower, I'd say I'm still in my experimental phase since I think my flower shaping skills have definite room for improvement, but I think I've learned some tricks about putting one together.  First of all, I punched eight 2 3/8" scallop circles to create the flower.  Then another key trick is to use a hot glue gun to nest the petal layers together.  Once I have it down to making these rosettes how I like it, I may put together a tutorial for you...we'll have to see :)  Here's one more look at the card for you:
I used the Pear Pizzazz seam binding ribbon to create the rouching.  I have to say that seam binding is such a DREAM to work with! Not only does it stay nicely on the sticky strip, but it really is super easy to put into place, too.  And for my lace, I used the pretty Victoria Crochet Trim.  I think the Vintage Wallpaper embossing folder makes the perfect background for that shabby chic look, which I am such a fan of these days.  How about the recipe for you?
{Ribbons and Lace Easter Wishes}
*Stamp Set: Something to Celebrate {Occasions Mini Hostess Set}
*Cardstock: Crumb Cake, Very Vanilla, Subtles Patterns DSP {In Pretty In Pink}, Pear Pizzazz
*Inks: Crumb Cake, Early Espresso
*Accessories: Vintage Wallpaper Embossing Paper, 2 3/8" Scallop Circle Punch, Blossom Punch, Scallop Oval Punch, Basic Pearls, Pear Pizzazz Seam Binding, dimensionals, sticky strip, hot glue gun
Hope you liked this project...now how about heading over to Hand Stamped Sentiments and playing along with us this week?  Can't wait to see what you come up with!


Sunday, February 6, 2011

simply be my {Valentine}

Hi there bloggie friends!  Did you guys watch the superbowl?  Congrats to all the Packers fans out there!  I thought I'd post a quick card I created trying a new technique I learned from dear friend Sharon Field at Created By U - she shows how to use the Framed Tulips Embossing Folder to create a border on different sized cards!  How fun, right?  She's a genius and it really does come out perfect! For my card, I used a 4 1/4" square base.  I made a little Valentine so that I could play along with this week's Paper Player's challenge, too!  WooHoo!!  Their theme this week is Love is in the air:

Now here's a look at my full card:
And here's a look at the inside:
Super simple, but I have to say I've been inspired by clean lines lately..not to mention, square shaped cards.  In Crumb Cake.  You'll see more of these square cards this week.  :)  How about the recipe for this simple valentine?  As I mentioned, you should hop over to Sharon's blog if you'd like to see how to do the card border! 
{Simply Be MyValentine}
*Stamp Set: Filled With Love
*Cardstock: Crumb Cake, First Edition DSP, Real Red Glimmer Paper
*Inks: Real Red Classic Ink, Crumb Cake {sponged on the edges}
*Accessories:  Framed Tulips Embossing Folder, Real Red 1/8" Taffeta Ribbon, Petal Card Extra Large Double Punch, Heart To Heart Extra Large Punch
Hope you like it.  Would love to hear what you think!  Thanks for stopping in! 


Saturday, February 5, 2011

sweet stitches {lollipop bloom} Birthday


Hello there, bloggie peeps!  How's your Saturday morning going?  I'm feeling refreshed from a good night's sleep and feel inspired to get organized.  Behind the scenes, I've been working on my craft studio and have been chipping away and making some progress.  It's amazing all the things I'm rediscovering that have been tucked away in a nook or cranny I have not visited or overlooked.  Do you do that?  Well, now that things are in sort of a semblance of order, I've gotta say it's made crafting even THAT much more fun for me!!  Funny how uncluttering my little space has made me see things more cleanly!  Now, for today's card share...

So, I have to say I have been quite enamored with the Sweet Stitches paper, and specifically, the Lollipop flower print.  So much so, that I was inspired to create this clean and simple card from the cute bloom that adorns the page!  It's just so simple and sweet, I love it!  I made it using the 1 3/4" circle punch and the  cute little Medium Oval punch introduced in the Holiday Mini.  The leaves are from the 2 Step Bird punch - how cute is that?! I am also really digging the Happy Birthday sentiment from the Something to Celebrate Hostess set in the Occasions Mini.  It looks so cute with the pompom, border, too!  Stamped on the textured paper, it's got such a pretty vintage feel to it.  So fun! What do you think?  I would love to hear from you!
This is such a perfect card to have on hand for Birthdays! Here's the recipe for you:
{Sweet Stitches Lollipop Bloom}
*Stamp Set: Something to Celebrate
*Cardstock: Textured and Smooth Baja Breeze, Textured Melon Mambo, Very Vanilla, Early Espresso, In Color Patterns Designer Series Paper Pack {Blushing Bride and Pear Pizzazz}
*Inks: Melon Mambo
*Accessories: 1 3/4" Circle punch, Medium Oval Punch, 2 Step Bird Punch, Corner Rounder, Melon Mambo Pom Pom trim, Sweet Stitches Fabric Brad, distressing tool {from the Cutter Kit}
Easy peasy!! Give it a try and have fun!  Thanks for visiting today.  Hope you enjoy your weekend!


Thursday, February 3, 2011

{Highlights} of my first CHA experience

Hi all!  Hope you're all having a great week so far!  I have been chomping at the bit to post pictures of my first CHA experience - but have been so busy tied up with day to day work activities that I haven't had a chance til now!  For those of you who are curious as to what CHA is - it stands for Craft and Hobby Association and they had their Winter Show at the LA Convention Center this past week.  And boy!  Was it a feast for the eyes!  It started last Friday and ended this past Tuesday.  I was lucky enough to go on Saturday, but have made a mental note to make sure I can go for more days the next time it comes around here next January 2012.  I took LOTS of pictures and got lots of great ideas of all the latest and greatest products out there in the craft industry.  I even got to meet a few blogging friends like Nina Brackett, Kazan Clark and Windy Robinson.  You'll see Windy below, but I was camera challenged by the time I saw Nina and Kazan and completely forgot to to snap some pics!!  Boo.  Oh welll - the memories are captured in my brain. :) Here are some highlights of the fun things I saw.  {BTW - how gorgeous is that fun paper dress with the butterflies!!}  Anyway, hope you enjoy these...


Here I am with Windy Robinson - she's so sweet!

It was so great to see Stephanie Rahmatulla, of Me and My Big Ideas, who's a friend of mine from high school!

After wandering through the show floor, I mosied over to a card class, hosted by SRM Stickers and Cosmo Cricket, and got to meet up with fellow demo, Dianne Shiozaki.  We had a great time!  Again, I forgot to take pictures with my camera, so here's a sneak peek of the cards after I got them home in my craft studio.
All in all, I had a fab time!  One key take away I got is that this crafting season is "for the birds!"  {heehee}  There was a strong theme of everything BIRD related, along with lots of pretty banners of all shapes, sizes, and  occasions!  Hope you enjoyed these pics from the Winter CHA show!  Bye for now, dear crafty friends. I'll catch up with you guys soon!