Showing posts with label 2S4Y. Show all posts

Monday, January 17, 2011

forever {fabulous}


Hi there bloggie friends.  Today's post is a little nostalgic for me - the fabulous duo of 2S4Y - Laura Davis and Kazan Clark - have announced that this week's post will be the final post at 2Sketches 4 You, as they will be pursuing new opportunities both in and out of the craft world.  It's a very exciting time for the both of them.  And very well deserved, because I just think these 2 ladies are so awesome!  They gave me my first opportunity to be on a design team, and for that, I will be forever grateful!  I encourage you guys to check out the site and play in this final challenge one last time.
I created this card using the Framed Tulips embossing folder and that pretty bloom is from the Fun Flowers Bigz L die.  I've always been fond of the yellow/brown combo {in SU! terms, that would be So Saffron, Daffodil Delight, and Early Espresso}, and it's been on my brain lately because of this charming Cafe that I discovered just recently by my house called Yellow Vase.  It's in such a quaint and charming little spot, I'll have to take pictures of it the next time I go!  Here's one last look of the card:
What do you think?  I love how the embossing folder creates such a pretty frame - it's a quick and easy way to dress up a card, that's for sure!  Hope you like it.  Here are the deets:
{Forever Fabulous}
*Stamp Set: Fabulous Phrases
*Cardstock: Early Espresso, Dafodil Delight, Whisper White, Sweet Stitches DSP
*Inks: Early Espresso
*Accessories: Fun Flower Bigz L die, Framed Tulips embossing folder, Daffodil Delight 1/8" ribbon, dotted scallop border punch, corner rounder, Itty Bitty Shapes punch pack, Basic Pearls
Now, don't forget to hop on over to 2S4Y and take a peek at the challenges.  Hope you'll play along on this final farewell sketch!  Have a great day!


Thursday, November 18, 2010

polka dot cupcake fun for the 2S4Y Challenge

Hey there!  I've got a fun card share today with a little blog story.  So, almost a year and a half ago, I had the pleasure of "virtually" meeting Jane B through our blogs.  She is such a sweetie and super talented paper craft gal.  I enjoy her style and frequent her blog for inspiration.  In the course of the time I've known her, she's now producing her own line of stamps that I just LOVE!  She draws the cutest images, as you can see - how adorable is that cupcake and banner!  I used my brand spankin' new Jane's Bakery set today to play along at this week's 2S4Y challenge.  Hope you like it!  Here's a look at the sketch that Kazan created.
I've been in such a Christmas mode with my crafting lately that it felt nice to do a non holiday card!  Funny, huh?  I especially liked building my cupcake - here's a closer look. 
I actually stamped the pink polka dots on the cupcake and paper pieced the cupcake holder in the Peach Parfait paper.  How about that button - this pink flower beauty was created by Jane {yes, she hand makes her buttons, too!}  I just added a few pearl embellies to pop up the center.  Here's the recipe for you: 
{Polka Dot Cupcake Birthday}
*Stamps: Jane's Bakery by Jane's Doodles
*Cardstock: Whisper White, Regal Rose, Nursery Suite Specialty DSP, In Color Patterns DSP
*Inks: SU! Regal Rose, Basic Black; So Saffron, Regal Rose, Peach Parfait, Pretty in Pink Markers
*Accessories: SU! Regal Rose Double stitched Grosgrain ribbon {retired}, Scallop Border, Basic Pearls, Jane's button
Thanks for stopping in for a visit!   Have a great day! :)


Monday, October 25, 2010

2S4Y with Love


Hi there blog peeps!  I can't believe it's the last week in October already!  But not only is it the last week of October, alas, it's also my last week as a part of the 2S4Y Design Team.  I had a great time during my Summer and Fall Design Team terms...I just can't believe that it's already coming to an end!  Well, that my dear blog friends, is why my post is titled 2S4Y with love :)  I definitely enjoyed being on the DT and had a great time getting to know Laura, Kazan and the awesome design teams from the last 2 terms!  So, without further adieu, here's a look at the 2S4Y Sketch of the week. 
Another beautiful sketch from Laura!  This week's sponsors at 2S4Y are Starving Artistamps, and I used the beautiful Backlit Blooms for my card.  Here's a full view:
I love the pretty flower images!  I inked them up in Riding Hood Red  and added a few pearl embellies in the flower centers to dress them up just a touch. I used the Love Letter DSP, which I just love..I think the pretty vintage print reminds me of Paris.  And for the ribbon treatment, I cut the Striped Grosgrain ribbon width in half, which left a pretty frayed edge, then I did a running stitch to bunch it up.  I adhered it to the cardstock with double stick tape to keep it secure - and viola! A fun fringy bit of ribbon edge!

Hope you guys will play along with us at 2S4Y this week. I thank Kazan and Laura for the honor of being part of such a fabulous Design Team!  While it's the end of my fun term, it'll be a brand new beginning for 3 new designers at 2S4Y - make sure to check them out next week!

Thanks for visiting me today.  Have a great day!


Monday, October 18, 2010

Bonus sketch card for 2S4Y!

Hi blog friends!  I'm excited to share the Bonus Sketch Design I created for 2S4Y this week.  How fun - it's my first time designing a card for a challenge blog, so I'll be really looking forward to seeing all the creative interpretations of this sketch!  Here it is:
So, what do you think?  I would ESPECIALLY love for you to play along this week at 2S4Y to see what you come up with!  Our sponsor for the week is Clear & Simple Stamps, and for my card, I used the beautiful Harvest stamp set.  Here's a look at my card:
Love the autumn images..just perfect for Thanksgiving!  I used the Autumn Spice DSP and dressed up the focal stamp with a frame of the Early Espresso waffle paper.  Here's a closer look:
I love the striped grosgrain ribbon - just a smidge of a bow to accent the image.  How do you like it?  I hope it inspires you to play along!  This week, there's 2 bonus sketches - mine and Regina's - along with Kazan's awesome sketch of the week.  Make sure to pop on by at 2S4Y!  You can check out the DT blogs here:


Have a fantastic day!


Monday, October 11, 2010

2S4Y Winter Wonderland!

Hi blog peeps!  It's Monday, which means it's 2S4Y time.  WooHoo!  We got another free week to create and design our cards using any products we like...so here is what I came up with.  Are you ready to check out the Winter Wonderland card I created?  First, let's take a look at Kazan's awesome sketch:
I was really inspired to do a Christmas Theme when I saw this sketch.  Maybe it's because I still had the vintage Christmas colors from the Deck the Halls DSP on the brain from my Vintage Santa card last Friday, but in any case, I continued with the holiday spirit.  Here's a look at my full card.

If you've visited my blog before, you'll know that I love me the Greeting Card Kids stamp set.  It turns out that I also love this yummy Cherry Cobbler color with this vintage look.  I also played with the waffle paper and created my ribbon edge around the circle.  It turns out that the waffle paper is really nice to work with!  It's very pliable and easy to scrunch to create that evenly crinkled border.  Here's a closer look at a few details on the card:
The seam binding ribbon is soo cool to work with because it makes such pretty bows so effortlessly.  All I did to create my bow is wrap 2 loops of ribbon around my hand, then I cinched the middle with the tinsel and then threaded the tinsel through the button. The final step is adhering it to the circle piece of cardstock using mini glue dots. Viola!
And here's a closer look at the waffle paper.  I cut 2 strips of the waffle paper at 1" thick.  One strip goes around just over half of this 2 3/4" circle, so I used the second strip to finish it off and just trimmed the excess.  I used Mono adhesive around the back edge of my circle, then scrunched and secured the waffle paper to the adhesive as I made my way around.  I'll be making more of these circle pieces for sure!  You like?  Hope so!
Here's the recipe for you:
{Winter Wonderland Greeting Card Girl}
All supplies Stampin'Up!
*Stamp Set: Greeting Card Kids, Bright Christmas
*Cardstock: Cherry Cobbler, Whisper White, Deck the Halls DSP
*Inks: Cherry Cobbler, Crumb Cake, and Basic Black Classic Ink Pads; cherry Cobbler, Always Artichoke, Pear Pizazz, Daffodil Delight, Soft Suede, and Blushing Bride Markers
*Accessories: Waffle Paper Assortment 1, Basic Pearls, 2 3/4" circle punch, Silver Tinsel Trim, Deck the Halls Big Designer Buttons, sponge daubers, Snail Monoadhesive, dimensionals, mini gluedots
Now, don't you want to come play along with us at 2S4Y?  You've gotta check out the rest of the amazing 2S4Y Design Team's creations!
Angie, Courtney, Kazan, Kelly Marie, Laura, Regina, Stacey
So glad you came by!  Hope you have a great one!


Monday, October 4, 2010

2S4Y Sketch time!

Hi there blog friends!  How are you guys?  I know it's been a little while since my last post, but the weekend was a busy one and I didn't get a chance to make my way over to the good ol' computer.  I ran my 10k race on Saturday morning and I'm happy to report that I finished and did ok.  Not my best race, but given that I haven't really had much time to train as well as I'd liked, I was pleased with how I did.  Then, Sunday was my World Card Making Day event and we had lots of fun making the projects!  So, that sums up my weekend in a super quick nutshell...now how about this week's 2S4Y sketch?  You got a sneak of it up top.  Here's a look at the fun sketch #62 that Laura created:

So for this week's sketch, we got a free week, so that means we were open to use anything and everything we wanted to represent this sketch.  I have been wanting to use my new Aviary stamp set from SU!, so I played with one of the fun birdcages from the set.  Here's a look at the full card:
I love playing with the ruffle look, so I used the Delightful Daffodil taffeta ribbon and got my bird card all "ruffled up!"  {heehee}.  The trick with the ruffled ribbon is doing a running stitch along one edge of the ribbon, then you'll gather and scrunch up the ribbon to a length just slightly longer than the cardstock edge you want to have ruffled.  Next, you'll want to adhere the ruffle using sticky strip.  Put the sticky strip along the edge of your cardstock (on the back side).  Start by adhering both ends of the ribbon first, then work your way to the middle while evenly spreading your ruffles.  Once you're done, flip your cardstock over to the front and you'll see how cool your ruffles look! Then' you'll repeat this process on the opposite edge to get that ruffled up, too.  When your ruffles are adhered, you'll want to put another piece of sticky strip on top of your ruffled edges and this will secure your ruffles in place and also secure it to your card base.  Hope that explanation made sense!  I also used the eyelet border to dress up the top edge of the DSP a little.  I had fun with the sentiment - I used the Curly Label punch and tucked the bottom half of it behind the bird cage.  And finally, my last embellie was the little yellow flower button with a tiny piece of baker's twine threaded through.  And Viola!  One last look at the finished card.  Hope you like it!
{Aviary Birthday}
All supplies Stampin'Up! except where noted:
*Stamp Set: Aviary, Happy Moments
*Cardstock: Early Espresso, Nursery Suite Specialty, Whisper White
*Inks: Early Espresso, Regal Rose
*Accessories: Eyelet Border punch, Curly Label Punch, Daffodil Delight Taffeta ribbon, Subtles buttons, White Gel pen, dimensionals; baker's twine - craft store
Thanks for popping by today!  Now go check out what the awesome 2S4Y Design Team's created for this sketch and come play along with us!

Bye for now!


Monday, September 27, 2010

2S4Y Just for You

Hi all!  How cute are these guys!!! Too stinkin cute, don't you think? Hope you guys had a great Monday.  I'm running a bit behind on my Monday post, so I appreciate you guys being patient with me. I had fun making my card from Kazan's cool and edgy sketch created for this week's 2S4Y challenge.  Here's a peek at the sketch:
Isn't it pretty?!  My card was inspired by the cute Robot Buddies stickers from this week's sponsor, EAD Designs.  They are such adorably cute and happy images!  Such a cheery little card! Now, go and check out the fabbie samples at 2S4Y - my fellow DT gals are just amazing.  Hope you'll play along with us! Also note that it's that time of year when Kazan and Laura are looking for new design team members, so if you're interested, definitely check out the last few week's posts! {wink!}

Have a goodie! :)


Monday, September 20, 2010

2S4Y {Joy!}

Happy Monday, blog friends!  It's time for this week's 2S4Y sketch.  I got back in the holiday spirit with this week's sketch.  These fun Christmas Ornaments are from Robin's Fetish, who happens to be this week's sponsor over at 2S4Y.  Wanna see the awesome sketch Laura created this week?
I basically rotated it 180 degrees to come up with this:

I do love this color scheme for Christmas - it's festive in a fresh, alternative way, don't you think?  I had fun dressing up this card with tinsel, buttons, ruffles and a banner, even.  And, I can't seem to get enough of the baker's twine!  Such a fun embellie.  If you've peeked at my last handful of posts, they've been a must have for my cards!  I've been taking angled views of my cards lately, just to give you guys a different perspective.  So here's the parting shot of this card:
Whaddaya think?  Hope you like it!  Here's the recipe:
{Christmas Joy!}
*Stamp Set: Robin's Fetish Christmas Ornaments digistamp
*Cardstock: Kraft, Candy Cane DSP
*Inks: Real Red and Baja Breeze markers
*Accessories: Billboard decorative strip die, Real Red Satin Ribbon, Tinsel Trim, Candy Cane buttons, Silver Fox pearlized accent ink, baker's twine
Hope you guys have a great week!  I appreciate you peeking in today! :)


Monday, September 13, 2010

2S4Y Time!

This week's sketch for 2S4Y was a lot of fun to do.  I've been on a flower kick lately and again, I had created the flower first and then created the card to put it on afterwards...pretty backwards, huh?  Here's a look at the sketch - {I was excited to see that I'd have a spot to put my flower}: 
And here's a look at my full card:
I love this color combo - I was inspired to use this palette after perusing the CB2 catalog...they've got this gray/ poppy color scheme subliminally embedded in my head!  How fun are those daisy flowers from Starving Artistamps!  They are this week's sponsor at 2S4Y.  I double stamped them to create that silhouette look.  For some reason, this card reminds me of France - maybe because of the pretty poppy fields I remember seeing from the train when we had vacationed there.  It could also be that the words on the paper I used are in French! ;)  Oh, how I'd love to go back to Paris one of these days!

So how do you like my poppy flower?  I promise I will share a tutorial on how to make them.  For now, suffice it to say that they are made out of the modern label punch.  You'll see they are super easy to make, too.  Here's the recipe:
{Bunch o'daisies birthday wish}
*Stamp Set: Starving Artistamps, Occasional Quotes
*Cardstock: SU! Poppy Parade, Very Vanilla, Basic Gray, Presto Patterns Specialty DP
*Inks: SU! Basic Black, Poppy Parade Classic Ink Pads, Smooch Spray in Silver Foil
*Accessories: Extra Large Decorative Label Punch, Modern Label Punch, Tasteful Trim Bigz XL die, Silver waffle paper, Very Vanilla Seem Binding, Antique Brads
Whaddaya think?  Would love to hear from you! I also hope you'll come and play along with us at 2S4Y!  Have a great week!


Monday, August 30, 2010

2S4Y card sketch time!

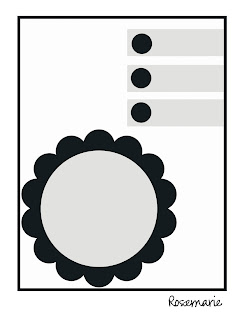
Hello there blog friends!  Hope you enjoyed your weekend.  I can't believe we're right on the cusp of September already!  Well, today is Monday, so that mean's it's time for this week's 2S4Y sketch.  The sneak peek photo above just shows you snippet of the fun ribbon {which is my current favorite ribbon treatment, at the moment!}.  Like it so far?  Well, first, let's take a look at the awesome sketch that Kazan created for the week.
So what I ended up doing is flipping this sketch upside down to create this card.
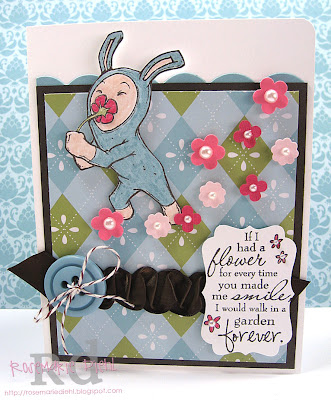
The fun stamps on the card are from our sponsor of the week, Paper Makeup Stamps and the image I used was Caliope with a Flower - so cute.  I just love the little sentiment, too.  It inspired me to create a little garden path of flowers from a variety of punches.  Then, I added some pearl embellies in the center and made them pop up with dimensionals.  So back to the ribbon....isn't that scrunched up look so fun?!  It takes a little bit of practice, but once you get the hang of it, you'll see that it's fun to do!  In this card, I used 2 strips of the double stick tape that's about 1/4" wide.  I think it holds the ribbon more securely when you have a wider strip of adhesive. Anyway, once you do that, you begin to apply the ribbon to the adhesive in a zig zag fashion, twisting the ribbon and using your thumb to pat down and secure the ribbon as you go.   Viola!  It's got such a unique look once you're done.  Then I added the button to accessorize and complete my treatment. Hope you like the card.  Here's another look for you:
What I love most about sketches is trying to figure out what sort of theme I'm going with, then I try to carry that through the card.  For this particular card, I really wanted to create a scene that matched the quote.  So, I got a little "punchy" and used some of my favorite bitty flower punches!  Hope you like the card!  Here's the recipe for you:
{Flower garden whimsy}
*Stamp Set: Caliope with a Flower, If I had a flower
*Cardstock: SU1 - Whisper White, Early Espresso, Nursery Suite Specialty DSP
*Inks: SU! - Baja Breeze, Blush Blossom, Pear Pizazz, Melon Mambo Markers; Basic Black Classic Ink Pad
*Accessories: Early Espresso Satin Ribbon, Baja Breeze Button, Designer Label Punch, Tasteful Trim Bigz XL die, Trio flower punch, Itty Bitty Punches, Basic Pearls; baker's twine
So how about checking out what the rest of the 2S4Y Design Team's created? 
We'd love for you to play along, so come visit us at 2S4Y and enter your card!
Have a great week!


Friday, August 27, 2010

2S4Y Birthday Blog Hop for Laura!

Hi all!  Today, I've got a special card I've created for 2S4Y's blog hop for Laura Davis's Birthday!  Happy Birthday, Laura!!  Regina, a fellow 2S4Y designer, planned this little birthday tour and I hope you'll follow along with us!  Here's a look at my full card:
Isn't that image just darling?  It's from an SU! set called Greeting Card Kids and I just think it's so adorable!  I was excited to use it for Laura's birthday card!  I am also a big fan of this color combo from the new Love Letter DSP...so vintage looking and so yummy!  Hope you like it!  Here's the recipe:
{Birthday Wishes for Laura!}
All supplies SU! except where noted
*Stamp Set: Greeting Card Kids, Occasional Quotes
*Cardstock: Basic Black, Love Letter DSP, Riding Hood Red, Very Vanilla
*Inks: Basic Black, Early Espresso Classic Ink Pads; Riding Hood Red, So Saffron and Poppy Parade Markers
*Accessories:Top Note Bigz Die, Scallop Square Bigz Die, Victoria Crochet Trim, Basic Black Striped Grosgrain Ribbon, Scallop Oval Punch, Modern Label Punch, Candy Cane Big Designer Buttons, Basic Rhinestones; Twine {PTI}
I've got one last look at the card for you:
Now have fun checking out the rest of the 2S4Y Design Team blog!

And last but not least, you can visit the Birthday Girl herself!
Feel free to pop on by and wish her a Happy Birthday!!

Toodles for now :)


Monday, August 23, 2010

{love letter} for 2S4Y

Hi all!  Happy Monday! It's time for this week's 2S4Y sketch!  This was a freebie week, so we got to use any products we wanted to with Laura's sketch of the week.  How do you like the sneak peek so far?  I loved experimenting with the paper flowers!  I got that mottled look by spraying it with water, scrunching up the flowers, and then used a direct to paper technique by laying the flower onto the cherry cobbler stamp pad and lightly ran my fingers on the paper petals to get the color.  I used a similar technique on my Peony Flower tutorial.  Here's the fun sketch that Laura created:
I love this sketch - probably because I love working with panels and tinkering with mixed patterns.  For this card, I used the Love Letter DSP, and also stamped one of the panels using the Artistic Etchings stamp set. Here's a look at my full card.
What do you think?  Aren't those patterns so fun?  I love the color scheme, which is Basic Black, Riding Hood Red, Very Vanilla, and I also used Cherry Cobbler for the flower.  I'm getting lots of use out of the Curly Cute stamp set - love the look of the swirly greetings!  Here's one last look at the card for you:
Another fun accent is the baker's twine - that's one hot accessory I've been seeing on cards lately and I just love the look!  Here's the full recipe for you:
{Love Letter Birthday}
All supplies Stampin'Up! except baker's twine
*Stamp Sets: Artistic Etchings, Curly Cute
*Cardstock: Love Letter DSP, Basic Black, Very Vanilla
*Inks: Cherry Cobbler, Basic Black, Early Espresso {for the sponged edges}
*Accessories: Paper Flowers, Antique Brads, Regals Designer buttons, baker's twine
Hope you like it!  Thanks for dropping by today.  Now be sure to stop by 2S4Y - we'd love for you to play along!


Monday, August 16, 2010

2S4Y...{pirate's life} for me

Yo ho, yo ho, a pirate's life for me!  I kept singing that song when I was making this card.  happy Monday, all! This week's sponsor at 2S4Y is AI Factory, and this fun pirate's image is one of their digistamps!  Isn't he a cute pirate?  I think he is just adorable!  Here's a look at Kazan's inspirational sketch:
And here's my full card:
I turned the sketch on its side.  I was trying to figure out what sentiment to add, but didn't have any pirate like sayings.  My hubby, though, made one up that made me chuckle.  He said "I'd give you an arm and a leg for that treasure!"  Too funny.  I ended up tying something to my pirate's hook.  Here's the recipe for you:
{Pirate 4U}
*Stamps: Pirate {AI Factory}, Tiny Tags {SU!}
*Cardstock: {SU} - Wicked Fun Specialty DSP, Concord Crush, Whisper White, Basic Black
*Inks:{SU} - Concord Crush, Blush Blossom, Basic Black, Basic Gray, River Rock, Chocolate Chip, Sahara Sand, Soft Suede, More Mustard markers
*Accessories: Pinking Hearts border, Basic Black striped ribbon, Mini Vintage tags
Thanks for checking in today!  Now go and take a look at the 2S4Y site and come play along! 


Monday, August 9, 2010

sweet fairy {hello} for 2S4Y

Hi all!  It's a brand new week, so that means it's time for a new 2S4Y sketch!  If you've seen my last couple of posts, you'll know that I've been having lots of fun playing with some of my new SU! products.  Well, I happened to incorporate a few things in my card today as well {wink}.  This week's sponsor at 2S4Y is Character Cafe, which is where the darling image you see above is from.  It's a digi stamp called Fairy Belletif.  But before I show you the full card, here's a look at Laura's sketch:
There's lots you can do with this sketch!  Very versatile, yet love the nice and clean lines.  Now, here's a look at the full card:
Isn't this fairy image precious?  I'm not typically one for Fairies, but this one is so sweet.  I had a lot of fun embellishing her - from her wings to her dress!  Not sure if you can tell in the picture, but I coated her wings with the Smooch Pearlized Accent Ink - it's applied like nail polish and has a nice little glimmer to it.  Then, I went a little nuts with my half pearl embellishments - those are so fun to apply!  Tip:  I've found that using a tweezer to place the pearls makes it much easier to get it to the exact spot you want.  What do you think of the card?  Hope you like it.  Here's the recipe for you:
{Fairy Hello}
*Stamps: Fairy Belletif {Character Cafe}, Tiny Tags {SU!}
*Cardstock: Very Vanilla, Blushing Bride, Sweet and Sour DSP
*Inks: Crumb cake {used to sponge the edges}, Regal Rose, Rose Red, Pretty In Pink, Blushing Bride
*Accessories: Tastful Trim Bigz XL die and Very Vanilla Seam Binding {sneak peeks from the Holiday Mini}; jewelry tag medium punch, string, Smooch Pearlized Top Coat
So, how about you check out the fab cards at 2S4Y and play along!  Cheers :)


Monday, August 2, 2010

Happy Monday with 2S4Y!

Hi all!  How was your weekend?  Hope it was a great one.  I can't believe we've entered into August already.  Well, I think I've finally recuperated from my vacay jet lag and busy work week!  Thank goodness for weekends!  Today I've got this week's 2S4Y sketch for you.  Here's a look at Kazan's creative sketch:
The great thing with sketches - which I think keeps my creativity flowing - is trying to envision something new and fresh to do with the template presented that I haven't tried yet.  For me this week, it was experimenting with new color palettes.  This week's sponsor is Tiffany Doodles and the stamp set I used was the Dahlia stamp.  I just LOVE dahlias, so of course, I wanted to create my favorite color dahlia, which is the orangy-reddish ones that just look so bold and pretty.  Essentially, that's the color scheme that motivated me to create my card.  Here's a full look at what I made this week:

You could probably say that the colors look a little bit on the Halloween side, with the Pumpkin Pie and the Basic Black, but then I think the bold deep orange brightens it up a notch.  This fun bold color is from Stampin'Up!'s new In Color called Poppy Parade.  It is such a luscious shade! I also threw in a touch of vintage with the cool new SU! ribbon called Victoria Crochet Trim - so pretty and so fun to use!  Other fun embellies I added are new SU! items like the Vintage Button and the Vintage Trinket safety pin.  Whaddayathink?  I'd say it's a little out of my element, but I had fun experimenting and am pretty happy with the end result.  Hope you like it.  Here's the recipe for you:
{Little note with Dahlias}
*Stamp Sets: Dalia Digi Stamp {Tiffany Doodles}, Apple Blossom {Stampin'Up!}
*Cardstock: Crumb Cake, Whisper White, Basic Black, Pumpkin Pie
*Inks: {all SU!} Poppy Parade, Pumpkin Pie and Pear Pizazz Markers
*Accessories: {SU!} - Dotted Scallop Ribbon Border punch, Square Lattice embossing folder, Vintage Trinkets, Antique Brads, Victoria Crochet Trim, Scallop Trim Border punch, Word Window punch; Oval Scallop die{Nestabilities}
Thanks for stopping by!  Have a fantastic week.  Now, go head on over to the 2S4Y blog and get your fill of eye candy from the amazing 2S4Y Design Team! and while your at it, come play along with us! Bye for now.