Showing posts with label Holiday Mini. Show all posts
Thursday, October 31, 2013
Happy Halloween and a blog Trick or Treat!
Hello all! Hope you are having a great day so far. I have a little devil that wanted to pop in and wish you a Happy Halloween! He's certainly the friendliest looking little devil, isn't he? We'll be off to do some Trick-or-treating festivities shortly.
I made this cute digital card using MDS2. It's so easy to use and love how quick I can put something together!
Now it wouldn't quite a complete Halloween experience if you didn't get to go trick or treating on this visit to my blog, right? So for those of you that would like to leave me a message today, I'll be giving away a fun little treat to one lucky commenter. How about getting you started on your holiday cards with the cute Merry Little Christmas Simply Created Card Kit from the Holiday Mini?
Just leave me a comment on this blog post by midnight Pacific Time on Sunday, November 3rd and I'll pick one lucky winner and announce on Monday, November 4th! So, be sure to check back here to see who the winner is.
Good luck and have a fun time trick or treating! :)
Wednesday, July 25, 2012
Keep Calm and Carry On!
Hellooooooo there! I know it's been quiet on my blog...hope you all are doing well! I am still here, but busy as ever (or as usual?!). I was so excited to have a little bit of time to play with my stamping stuff. You wanna see what I came up with? I have to say, being out of practice with stamping is kind of like not having worked out in a long time for me...I'm actually guilty of both at the moment! But the analogy is, when I don't run in a long time, the first time back is always so much harder! So today, it took me quite a while to come up with an idea, even though I had all kinds of new goodies at my fingertips. Here's the card I created...
I decided to use the new Hostess set called Carry On, which I just LOVE. The sentiment is one that I'm sure you've seen - it actually originated as a saying on a poster by the UK government back in the 1930s. This said poster was rediscovered in 2000 and so the saying has been reproduced by various companies. So, all was fine and good until something had come up that caused the hostess set to be unavailable. Thankfully, somehow, things got sorted out so Stampin'Up! has made the hostess set available again! WooHoo! Now, here's a look at the card in an upright position:
I got to use a lot of fun goodies - even a sneak peek from the Holiday Mini catalog - can you guess what that might be? It's the Windows Framelit that I used for the sentiment and the matted border! And, I also have to say that I am really digging the Paper-Piercing Pak that has the templates to do a pierced border for all the sizes of the Windows Framelits in addition to templates for the Labels and Holiday Oranaments Framelits, too! With the origin of the phrase being from the UK, I couldn't resist using the retired crown charm - it just seemed so fitting. Hope you like it! Here's the recipe for you:
{Keep Calm and Carry On}
*Stamp Set: Carry On
*Cardstock: Daffodil Delight, Rich Razzleberry, Whisper White, International Bazaar DSP
*Inks: Rich Razzleberry
*Accessories: Windows Framelits, Finishing Touches Edgelits, Delicate Doilies Sizzlits, Paper Piercing Pak, Hemp Twine, 1/4" Daffodil Delight Grosgrain Stiched Ribbon, crown trinket {retired}, dimensionals, Snail adhesive
Thanks for popping by! I appreciate the visit. Have a great one!
Wednesday, September 21, 2011
Happy Owl-oween!
Hi all! How are you dear blog friends? I know it's been a while since my last post! I tell ya, I think time is a big enemy of mine these days because it doesn't seem to allow me to do everything I'd like to do in a given day. Do you guys feel that way sometimes? Well things have been quite busy on my front, which means that as a result, my blog has been somewhat neglected. So sorry, dear friends. I do miss you guys and keep wanting to share a bunch of things with you. I know I'll get there. It's just a matter of getting time on my side ;)
For today, I've got a fun Halloween post for you - how cute are those owls!! I made these Owl treats for a Woo Hoo Demo Swap this past weekend. Since I've found the need to try and maximize my crafting moments into the small windows of time I have, I opted for a quick and easy treat project that turned out pretty darned cute for how easy they were to put together! Here's a close up of one of the treats for you:
I used the Two tags die to create my little "treat jacket." What I did was start with a 3"x6" piece of Frightful Sight DSP, then folded it in half. I then placed it onto the tag die so that the crease of the DSP was just above the scoreline on the tag die. Then, run it through your Big Shot. For the front of my treat jacket, I punched out a Scallop Circle, then I stamped my adorable little Owl from the Warmest of Wishes Hostess stamp set {Holiday Mini} in Basic Black and punched it out with the Owl punch. Then, I adhered the treat to the inside and then tied up the treat jacket with the cute Scallop Dots ribbon in Basic Black. Viola! So easy peasy! You can put a variety of Halloween treats in this little jacket. For my sample, I had some extra Sugar Daddys that I had and used those. What do you think?
Wanna see the rest of the amazing Halloween swaps I got? Here's a look:
Now, aren't these just the cutest set of Halloween treats? The witch's hat is actually an outlet cover - isn't that clever? How do you like that tray that's holding all the treats? It's super easy to make.. I used our handy dandy Simply Scored board to make it. Just score a 12"x12" piece of DSP or Cardstock at 2 inches along each edge. Then pinch the corners into triangles and use your Crop-a-dile to punch a hole in the center of these triangles. Cinch up the corners with ribbon and knot it or make a bow to secure. Now you've got yourself a tray! Another quick and easy project that makes a great display for treats, cookies or really any baked goodie :)
Thanks so much for stopping by today! I will be posting this month's Final Friday giveway sometime tomorrow, too, so stay tuned for that. Have a great night!!
Wednesday, August 31, 2011
Ready for the Holiday Mini?
Hi bloggie friends! Hope you're having a great week! It's been quite an eventful one for me, so apologies for the lack of blog posts. In a nutshell, I went back to work full time this past Tuesday, so that in itself was quite an adjustment. It's amazing how much of an impact the past 12 weeks has had on my life. LBD {Life before Denver} seems like a lifetime ago and now it's hard to imagine LWD{Life without Denver!}. There's definitely a lot of juggling to be learned (by me, of course), but it's all good.
My card share today is a card I created for a Demo Swap we had this past weekend for the WooHoo stamper's demo meeting. I had fun making this card because it's predominantly made using goodies from the Holiday Mini that will be available tomorrow, September 1st in the US! It's my first Christmas card this year...can you believe it? Now that I've broken the seal on the Christmas stuff, you'll definitely see a lot more holiday cards in September! Wanna see the full card? Here it is for you:
What do you think? The card sketch is actually a CASE of one of the Christmas cards I created last year that you can check out on this post. I used some old current favorites - like the Top Note die, the Contempo Christmas stamp set, Real Red Baker's Twine, and the Decorative Label punch. And the NEW goodies I used are the Holly Berry Bouquet Specialty DSP (#124004, $12.95), the coordinating Holly Berry Designer Buttons (#125636, $8.95), and the new Stocking Accents Originals Die (#124099, $17.95). Lots of fun stuff! I just LOVE the specialty DSP - the picture doesn't do it justice because those fun polka dots really pop with those embossed glittery red circles! Hope you like it. Remember, the Holiday Mini products will be available for purchase on my Online Stampin'Up! website on September 1st!
Thanks for visiting today. Stay tuned for September's Final Friday giveaway post...it's coming soon :)
Bye for now!
Monday, August 15, 2011
Flirtatious Christmas Stocking {sneak peek!}
Good morning all! Happy Monday to you. I've got a quick post today, but a fun one! I had a chance to play with the new Christmas Stocking die cut that'll be available in the Holiday Mini starting on Sep 1. I decided I'd go with a non-traditional Christmas stocking, so I used the Flirtatious Specialty DSP and LOVE this girly look! :) Hope you like it too! Here's the full picture for you:
The stocking is a Bigz L die and measures 5 1/2" x 4 3/4". The heel, toe and top band are separate die cut pieces, so you can create a variety of looks and stocking styles! I embossed these pieces on Whisper White cardstock using the new Snow Burst embossing folder, which is also a new favorite of mine because it's such a versatile pattern! I die cut 2 pieces of the stocking and glued them together using the Multipurpose liquid glue. The little lace trim peaking out at the bottom of the band is a smidge of the pretty Lace Ribbon Border punch. To give my stocking a bit of a vintage-y look, I sponged the edges with Crumb Cake using a sponge dauber. I love this new die and think I'll be using it quite a bit for the holidays! It makes for a perfect size to stuff a gift card or small gift! I embellished my stocking with a little bit of Pink Pirouette Taffeta Ribbon, buttons and white twine. Oh yes - and the fun little Snowflake punch to give my stocking just an added bit of interest! Hope you liked this little sneak peek! Stay tuned for more projects using this adorable stocking die :) Have a great day!
Friday, December 3, 2010
Santa Claus is coming to town...
Oh you better watch out, you better not pout, you better not shout, I'm telling you why...
Santa Claus is coming to town!
I love this image of Santa - he truly looks so JOLLY, doesn't he? This is another card we created at my Holiday Class, but slightly stepped up. I made a few extras after the class and decided to add the twine and bells. I also "vintaged" it up a bit by using a sponge dauber and inking Crumb Cake around the edges. Here's a look at the original - still super cute with clean lines:
And here's how just a few slight tweaks can change the look:
So what do you think? I like them both. The simple clean line version is great for mailing and mass producing - it's super quick to put together if you cut all your supplies first and assembly line it. If you're just making a few or hand delivering some cards, then the stepped up version is a fun one to try. Just keep in mind that the bells add a thickness to the card which will require an extra 20 cents of postage. Here's the recipe for you:
Hope you like it! Thanks for visiting today :){Happy Jolly Santa}All supplies Stampin'Up! Except where noted*Stamp Sets: Jolly Old Saint Nick, Bright Christmas*Cardstock: Shimmery White, Candy Cane DSP, Real Red, Whisper White*Inks: Basic Black, Blush Blossom, Real Red, Regal Rose*Accessories: Real Red Polka Dot Grosgrain ribbon {from SU! Clearance Rack!}, Scallop Circle #2 Bigz die, Circle Cutter (Santa Circle is 3" in diameter), Smooch Pearlized Accent Ink (on the white parts of Santa's hat); Baker's Twine and Bells from craft store
Saturday, October 30, 2010
Saturday afternoon EBTKS Challenge
Hi all - I'm back with a 2nd post today, believe it or not. I've been wanting to get back into the swing with challenges, so as I was blurfing today, I came upon Everything But the Kitchen Sink Challenge #26 and I couldn't resist playing in the color challenge! Here's a look at the fun colors:
I love this color scheme. So pretty and fresh! Now, here's my full card:
I seem to have rediscovered my Top Note Die - I love it! Such a great shape. It's one of those dies that I used so much in the past, I had to put it away for a while. Now it's found a regular spot on my craft table {or should I say...floor - my extended workspace!} I've been having fun trying diffferent ways to place it on the card and as of late, I think I'm a fan of using part of the shape and trimming it off the edge of the card. For this card, I also used the Hostess Sets from the Mini catalog - Northern Hearts and Peaceful Season. I am really liking these colors for the Holiday Season! Here's the recipe for you:
Hope you like it! Thanks for stopping by :) Enjoy the rest of your weekend!{Peace On Earth}*Stamp Sets: Northern Hearts, Peaceful Season {SU! Holiday Mini Hostess Sets}*Cardstock: Textured Baja Breeze, Whisper White*Inks: Baja Breeze and Sahara Sand Classic Ink Pads*Accessories: Top Note Bigz Die, Tinsel Trim, Light blue craft store ribbon
Monday, October 11, 2010
2S4Y Winter Wonderland!
Hi blog peeps! It's Monday, which means it's 2S4Y time. WooHoo! We got another free week to create and design our cards using any products we like...so here is what I came up with. Are you ready to check out the Winter Wonderland card I created? First, let's take a look at Kazan's awesome sketch:
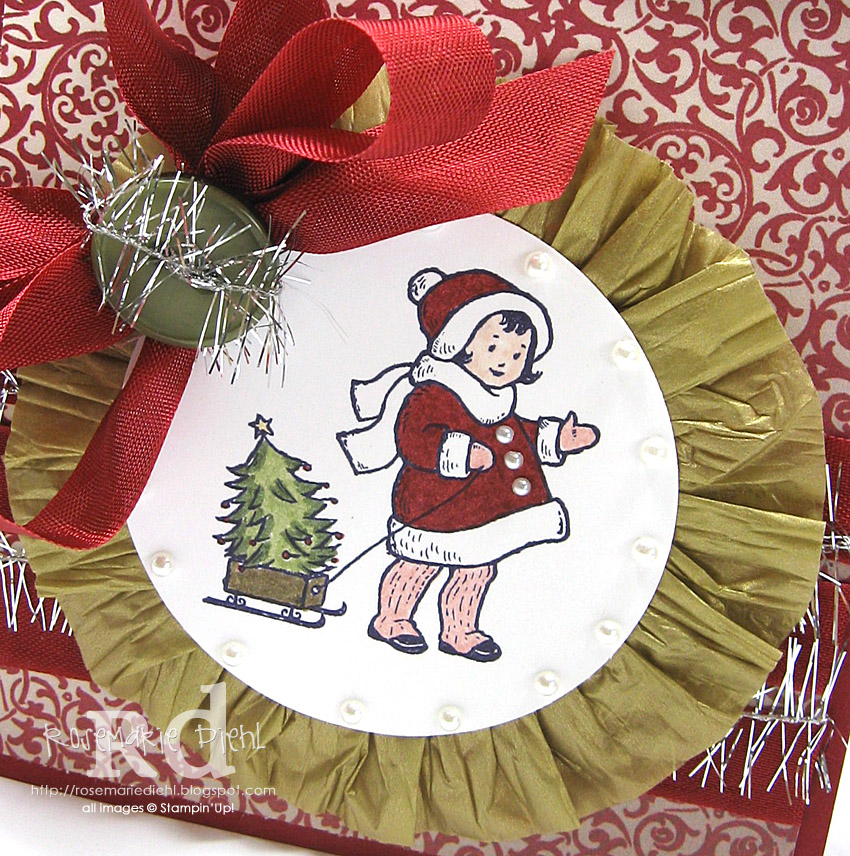
I was really inspired to do a Christmas Theme when I saw this sketch. Maybe it's because I still had the vintage Christmas colors from the Deck the Halls DSP on the brain from my Vintage Santa card last Friday, but in any case, I continued with the holiday spirit. Here's a look at my full card.
If you've visited my blog before, you'll know that I love me the Greeting Card Kids stamp set. It turns out that I also love this yummy Cherry Cobbler color with this vintage look. I also played with the waffle paper and created my ribbon edge around the circle. It turns out that the waffle paper is really nice to work with! It's very pliable and easy to scrunch to create that evenly crinkled border. Here's a closer look at a few details on the card:
The seam binding ribbon is soo cool to work with because it makes such pretty bows so effortlessly. All I did to create my bow is wrap 2 loops of ribbon around my hand, then I cinched the middle with the tinsel and then threaded the tinsel through the button. The final step is adhering it to the circle piece of cardstock using mini glue dots. Viola!
And here's a closer look at the waffle paper. I cut 2 strips of the waffle paper at 1" thick. One strip goes around just over half of this 2 3/4" circle, so I used the second strip to finish it off and just trimmed the excess. I used Mono adhesive around the back edge of my circle, then scrunched and secured the waffle paper to the adhesive as I made my way around. I'll be making more of these circle pieces for sure! You like? Hope so!
Here's the recipe for you:
Now, don't you want to come play along with us at 2S4Y? You've gotta check out the rest of the amazing 2S4Y Design Team's creations!{Winter Wonderland Greeting Card Girl}All supplies Stampin'Up!*Stamp Set: Greeting Card Kids, Bright Christmas*Cardstock: Cherry Cobbler, Whisper White, Deck the Halls DSP*Inks: Cherry Cobbler, Crumb Cake, and Basic Black Classic Ink Pads; cherry Cobbler, Always Artichoke, Pear Pizazz, Daffodil Delight, Soft Suede, and Blushing Bride Markers*Accessories: Waffle Paper Assortment 1, Basic Pearls, 2 3/4" circle punch, Silver Tinsel Trim, Deck the Halls Big Designer Buttons, sponge daubers, Snail Monoadhesive, dimensionals, mini gluedots
Angie, Courtney, Kazan, Kelly Marie, Laura, Regina, StaceySo glad you came by! Hope you have a great one!
Friday, October 8, 2010
{vintage Santa} for a new challenge
Hey there blog peeps! Yay - we made it to Friday. I've got a card I created for a new challenge {for me, that is} that I happened upon in my blurfing - The Paper Players Challenge. For this week, the challenge is creating a monochromatic card, so I thought I'd try my hand at doing a vintage Santa. I am really loving the rich Cherry Cobbler color and the Deck The Halls DSP, which is what I used in my card. Wanna see what the full card looks like?
Whaddaya think? I used my top note die in an unconventional sort of way by cutting an inch and a half off the short side, then using that extra scrap piece for my sentiment. I love the tinsel trim - it adds just a bit of sparkle to my card. And to finish it all off, I embellished with a seem binding bow and topped it with one of the fun Deck the Halls buttons! Hope you like it!
{Vintage Santa}
All supplies Stampin'Up!, except where noted
*Stamp Set: Bright Christmas, Jolly Old St. Nick
*Cardstock: Cherry Cobbler, Whisper White, Deck the Halls DSP
*Inks: Basic Black and Cherry Cobbler Classic Ink Pad;Cherry Cobbler Marker
*Accessories: Top Note Bigz die, Cherry Cobbler Seam binding, Deck the Halls button, Tinsel Trim, dimensionals, glue dots; baker's twine {from craft store}
Have a great Friday! Thanks for peeking in :)
Monday, September 20, 2010
2S4Y {Joy!}
Happy Monday, blog friends! It's time for this week's 2S4Y sketch. I got back in the holiday spirit with this week's sketch. These fun Christmas Ornaments are from Robin's Fetish, who happens to be this week's sponsor over at 2S4Y. Wanna see the awesome sketch Laura created this week?
I basically rotated it 180 degrees to come up with this:
I do love this color scheme for Christmas - it's festive in a fresh, alternative way, don't you think? I had fun dressing up this card with tinsel, buttons, ruffles and a banner, even. And, I can't seem to get enough of the baker's twine! Such a fun embellie. If you've peeked at my last handful of posts, they've been a must have for my cards! I've been taking angled views of my cards lately, just to give you guys a different perspective. So here's the parting shot of this card:
Whaddaya think? Hope you like it! Here's the recipe:
Hope you guys have a great week! I appreciate you peeking in today! :){Christmas Joy!}*Stamp Set: Robin's Fetish Christmas Ornaments digistamp*Cardstock: Kraft, Candy Cane DSP*Inks: Real Red and Baja Breeze markers*Accessories: Billboard decorative strip die, Real Red Satin Ribbon, Tinsel Trim, Candy Cane buttons, Silver Fox pearlized accent ink, baker's twine
Sunday, September 19, 2010
Fall Foliage Birthday
Hi all! I just have a quick post today - I'm playing in Dawn's Color Cue #8 challenge and used the colors to create my Dad's birthday card. Here's a look at colors:
For my card, I used So Saffron, Cherry Cobbler, Old Olive, and Whisper White. Here's a look at my full card:
Thanks for visiting today! Gotta go and get ready - we're heading over to the Lobster Fest to celebrate my Dad's birthday today...yum! I'll share pictures later!
Bye for now. Have a good one!
Thursday, September 9, 2010
Vintage Christmas {greeting card kids}
Morning! I have been wanting to make more cards from the Greeting Card Kids stamp set, so here is the first of 4 I'll be posting...today's is the Christmas one with the little girl. I just love all these images! They are so adorable. I also wanted to play with Stampin'Up!'s new fabric. Shelli Garder's challenge this month was to use the fabric in projects, so this is my first attempt. I've been fascinated with the ripped fabric look, so I tried my hand at making my own ripped ribbon fabric...turns out it's easy and fun to do! Of course, I didn't want to rip up too much of the fabric, so I started with a trial strip of about 3/4" thick. Wanna see the full card?
I had fun using the new snowflake embossing folder called Northern Flurry. It's in the new super cute Holiday Mini catalog. I used the little mini button brads from the Vintage Trinkets pack - it include vintage safety pins, too! Here's a closeup look at the sentiment:
You can see more detail of the embossed snowflakes. I went over them with a sponge dauber dipped in Whisper White craft ink to give that snowy glow. Hope you liked the card! Here's one last look.
And here's the recipe:
Have a great day! Thanks for visiting :){Vintage Girl Christmas}All supplies Stampin'Up!*Stamp Set: Greeting Card Kids, Teeny Tiny Wishes*Cardstock: Crumb Cake, Real Red, Whisper White*Inks: Basic Black and Cherry Cobbler Classic Ink pads, Real Red, Daffodil Delight, Pear Pizazz, Chocolate Chip, Crumb Cake and Baja Breeze markers; Whisper White craft reinker*Accessories: Northern Flurry Embossing folder, Hemp Twine, Candy Cane Designer buttons, Scallop Square Bigz die, Vintage Trinkets, sponge dauber, dimensionals, Candy Cane Fabric
Thursday, September 2, 2010
introducing...the Holiday Mini Catalog!
Hello blog peeps! The new Holiday Mini is now available. There are lots of cool products that I know you'll love...come take a peek and click on the link below!
There are so many fun products to inspire you to create for the holidays! Enjoy browsing...I'll catch up with you guys later!
Wednesday, August 25, 2010
Wicked Halloween
Hi all! I've got a quick share for you today to get you into the Halloween spirit in August :) Here's a card I created with the Wicked Cool stamp set. I also used the Tasteful Trim Bigz XL die on the Wicked Fun Specialty DSP for the jumbo ric rac in the background. I used a couple more fun products from the upcoming Holiday Mini - can you spot them? If you guessed the Scallop Square Bigz die {there are 2 scallop squares on the die} and the new Designer Label punch, you guessed right! Hope you like it!
Have a great day! Ciao for now :)
Friday, November 6, 2009
More Freebie Friday JOY!


Wanna win this frame? Here's what you need to do to play for this Freebie Friday giveaway - leave me a comment on this post with your email address or blog URL by 12 NOON, Pacific Time, on Sunday, November 8th. You can comment about anything or tell me about one memorable occasion in your life that brought you great JOY :) Can't wait to read about what you guys have to say!
Also, please note that I moved up the deadline time so I can pick a winner on Sunday and post who the lucky person is on my blog on Monday, November 9th.
Be sure to come back and see if you won! Have a great weekend!
Wednesday, October 21, 2009
Balloon Candy

{Balloon Candy}On a personal note, I wanted to tell you guys that things have been busy for me behind the scenes because I'll be starting a new job soon! I'm very excited about it. I'll be doing sales operations for a healthcare company, so I'm looking forward to being back in my realm of expertise. I'll have to figure out my work schedule and carve out time for blogging and crafting, so thanks in advance for understanding if my posting becomes a little erratic in the next few weeks. I'll try and blog when I can, but I'm sure I'll need to make some adjustments with scheduling and what not. I'll keep you guys posted!
All supplies Stampin'Up!
*Stamp Set: Sweet Centers, Teeny Tiny Wishes
*Cardstock: Whisper White, Bermuda Bay, Old Olive, Kraft
*Ink: Bashful Blue, Old Olive, Dusty Durango
*Accessories: Sweet Treat Cups, Bermuda Bay Polka Dot Grosgrain ribbon, Button Latte button, Linen Thread, Modern Label punch, Trio Flower punch, 1 3/4" circle punch, brads, dimensionals
Hope you have a great day and thanks so much for stopping by!
Monday, October 12, 2009
Delightfully Decorated...with glitter!


{Delightfully Decorated with Glitter}Thanks for visiting today!
All supplies Stampin'Up!
*Stamp Sets: Delightful Decorations, Teeny Tiny Wishes
*Cardstock: Kraft, Very Vanilla, Merry Moments DSP
*Inks: Chocolate Chip, Old Olive
*Dies: Holiday Windows, Curly Label Movers and Shapers
*Accessories: Button Latte, Ornament Punch, Mistletoe Ribbon, Silver Cord, Chunky Glitter, Sticky Strip tape, Modern Label Punch, Vanilla Brads, Linen Thread, Scallop Border punch
Saturday, October 10, 2009
2 Sketches 4 You Challenge


{Autumn Pinwheel Card}Hope you like it. Have a great day!
All Supplies Stampin'Up! except where noted
*Cardstock: Kraft, Autumn Meadows DSP
*Ink: Chocolate Chip Classic Pad
*Accessories, Chocolate Chip Grosgrain ribbon, Chocolate Chip corduroy button, hemp twine, and orange and brown buttons {PTI}.
Friday, October 2, 2009
Wow - Freebie Friday is already here!


All you need to do to play is leave me a comment with your email or blog/website address on this post by midnight Pacific Time on Sunday, Oct 4th. One comment per person please - that way it makes it fair for the random drawing ;) You can leave me a comment about anything, or let me know if you're gonna be doing anything for World Card Making day - like stamping cards at home or doing any sort of World Card Making day event! Come back on Monday to see if you're the lucky winner :)
Hope you all have a great day! Thanks for coming by!
Wednesday, September 23, 2009
Some quick and easy 3x3 Snowflake cards


{Snowflake 3"x3" Card}Hope you liked this little project. Have a great day!
All Supplies Stampin'Up!
*Cardstock: Real Red, Christmas Cocoa Specialty Paper {from the Holiday Mini}, Whisper White
*Accessories: Jumbo Snowflake Punch, Button Latte buttons, Hemp Twine, Mistletoe Ribbon
Subscribe to:
Posts (Atom)