Showing posts with label Embossing Folder. Show all posts

Monday, December 5, 2016

A little sparkle with Pretty Pines and Cable Knit


Hi there, friends! Hope you had a great weekend! I'm sure many of you are in the midst of holiday prep and all that good stuff...I know I am! So much to do and so little time! I'm just popping by today with a quick share of a Christmas card I made using the Pretty Pines Thinlits and Cable Knit embossing folder. So, this embossing folder is a brand new style that's thicker than the traditional embossing folders and I do have to say I was really amazed at the 3-dimensional texture of this knit - it really does pop! You can see the intricate details and it truly does transform the paper with this knit pattern!  I love the Pretty Pines thinlits, too. The pine needles and pinecones add a nice and festive touch.  I also wanted to incorporate a touch of sparkle, and what better to do so than with some gold sequins lightly dusted on the page?! To give the card some flair, I added a few random slivers of gold foil paper and Certainly Celery card stock to pizzazz it up a little. Hope you like it!

Here's a closer look at the Pretty Pines thinlits and Cable Knit embossing folder for you:


Hope you got some Christmas inspiration on your visit today. Thanks for stopping by! 


Sunday, October 2, 2016

Spooky fun Halloween scene!


Hey there Friends! Happy October! I was so excited to make my first Halloween card of the season since I got to play with some fun new goodies from the Stampin'Up! Holiday Catalog.  It all started with the Cookie Cutter Builder punch and the Cookie Cutter Halloween stamp set that I used for the cute little mummy. The Spooky Fun Photopolymer Bundle gave me the spooky scene I was looking for with the pumpkins, tree and the witch!

Here's some other close ups for you:


For my gray sky background, I used the Lucky Stars embossing folder.  Hope you like it!  Thanks for coming by - hope you're inspired to do some Halloween crafting! :)


Saturday, February 21, 2015

Birthday Bonanza!

Happy Saturday!  How are you all?  Hope you're enjoying your weekend so far.  Birthday season is starting in our family, so I've got a couple birthday cards to share!  I think I'll need to build up my stash, so get ready for more bday cards coming soon :) I can't quite tell you who I created these for since the cards are still in transit, but nonetheless, aren't they so fun and festive? I had a great time playing with the Celebrate Today stamp set and the Balloon Framelit dies that coordinate so perfectly.  I dressed up the envies with the Balloon Bash stamp set. I also love that both the stamp sets I used are photopolymer, too!  Here's a closer look.

The balloon framelits come with the cutest little accent dies, like the banner, bow and tassles that I die cut in the silver glitter paper.


I'm also loving the embossing folders, which add such a nice texture to the cards!

Here's a list of all the products I used!
Built for Free Using: My Stampin Blog


Thanks for popping by today and enjoy your weekend!


Tuesday, January 27, 2015

This Week's Stampin'Up! Weekly Deals {Jan 27} - Embossing folder mania!

Wait till you feast your eyes on this week's weekly deals! LOTS of super cute embossing folders are on sale! You can't go wrong picking up any of the embossing folders you might be missing.  I personally love the Decorative Dots, Lucky Stars and Polka Dot embossing folders...I'd say they're a must have for your paper crafting arsenal.  Have fun perusing the sale items or awesome Sale-a-bration or Occasions items on my online store here.

I'll catch up with you all soon! Stay tuned for posts from the Stampin'Up! Leadership Conference in Orlando. :)  I'll be posting on Instagram as well so feel free to follow me there - you can find me as stampdiehler.  Bye for now!


Saturday, November 8, 2014

Teenage Mutant Ninja Turtles {birthday card!}


Who's a fan of the Teenage Mutant Ninja Turtles?!  Well, apparently lots of kids are!  Today, we attended a friend's son's birthday party and he's all about the turtles.  So, I couldn't help but oblige and make him a Leonardo card.  It was a great challenge for me, since I haven't seen the latest movie or shows (my little guy is not quite into the Teenage Mutant Ninja Turtles yet).  Lucky for me there's Pinterest and the whole interweb to help guide me with some images and themes.  After doing my research, I came up with this fun little flip card for our friend Bryce who just turned 5!


I used the Thinlits Circle Card to create the Basic Black cardstock base.  Then I used the Honeycomb embossing folder to create my Old Olive layer that I added on top of the base.  For the sewer whole, I used the Circle Framelits and Chevron embossing folder.


Then, on the inside of the card, I created my Leonardo turtle!  So easy, thanks to the Circle and Oval framelits! For his mask, I cut out an extra circle in Night of Navy and then just hand cut it and laid it on top of the green circle.  I used scraps from the Night of Navy circle to make the ties. Fun tip: Use the banner punch to make the perfect ends on the tails! For the sentiment, I used the Age Awareness stamp set and cut it out with the banner framelit from the Thinlits Circle card. And last but not least, of course, I had to personalize the card! For that, I used the Little Letters Thinlits, which I just LOVE.  Viola!


Here's one last look at the card.  Aren't these flip cards great? Hope this has inspired you to make some ninja turtles.  They are pretty fun and easy to make!

Thanks for stopping by!


Saturday, July 19, 2014

Birthday wishes from a Stormtrooper


Hi all! I think I'm in one of those modes where Birthday cards are becoming an area of specialty for me...purely based on my personal quirk of having to create the cards based on the theme of the party.  So, for today's share, I've created this Stormtrooper card for our friend Luke's 6th birthday.  It was a little daunting for me, but with the help of my hubby, who drew it out on paper first, I then translated the drawing out of punches and dies.

Here's a few more pics for you:


I created the head out of the new Party Pennants Bigz Die, his eyes were made from the Triangle punch cut in half, his mouth was from the Oval punch, and his gills were made using the Fringe scissors.  Then, for the circles, I used the 3/4", 1", and 3/8" circle punches.  For his ears, I used 2 strips of cardstock that were 1 1/4"x1"  and 3/4" x 1". For the background, I used the cool Tiny Triangles embossing folder, which totally looks like the Death Star background, don't you think?

All in all, I was quite pleased with the outcome!  Here are some of the new products I used:

Party Pennants Bigs Die:


Tiny Triangles Embossing folder:


Fringe Scissors:


I'd love to hear what you think about the card! Thanks for stopping by today!


Monday, July 7, 2014

Bad Piggie Birthday

Happy Monday, blog friends!  Hope you guys had a great 4th of July weekend!  I had a very nice and relaxing one...though it sure did go by quick!  I've got a birthday card share today - it's the birthday card I created for my God son's Bad Piggie themed birthday party.  I knew I wanted to create a punched out piggie as soon as I found out the theme.  This was so much fun to make!  Lots of circles, as you can see.  I used the Circle Framelits along with an assortment of circle punches.  The eyes and nostrils actually came from the SU! Owl Punch.  I also used the owl "feet" for the balloon stems. That Owl punch definitely worked overtime on this card!

Here's a couple more pictures for you...
For the background, I used the Large Circles embossing folder, which is one of the NEW embossing folders in the SU Catty.  I just love these big circles!
Hope you liked this little card!  Here's the recipe for you:

{Bad Piggie BIRTHDAY FUN}!
Stamp Set: Endless Birthday Wishes
Cardstock: Lost Lagoon, Gumball Green, Tangelo Twist, Whisper White, Basic Black, Retired DSP scraps
Accessories: Large Circle Embossing folder, Circle Framelits, 3/4" circle punch, 1" circle punch, Owl Punch, Itty Bitty Shapes (retired) circle punch, Petite Pennants Builder punch,
Inks: Rich Razzleberry, Lost Lagoon
Thanks for visiting today. I wish you all a great week! By for now!


Tuesday, March 11, 2014

Stampin'Up!'s Weekly Deals {Mar 11}


Hi all!  Happy Tuesday to you. Stampin'Up!'s got another week of awesome deals for you to feast your eyes on!  Lots of great dies on sale this week!  I personally love me the Chevron embossing folder.  Here's one fun card I created using this embossing folder.  Chevrons are all the rage, so you can't go wrong!  You can shop at your leisure on my online store.

My {Tech Tip Tuesday} will be coming in a bit….

Bye for now :)


Saturday, March 8, 2014

Outdoor photo shoot!


Happy weekend blog friends! Today is such a beautiful day in Southern California that I decided to do an outdoor photo shoot of my cards. :)  These are the cards from a stamp party I did last weekend.  Simple, quick, and so easy peasy!


For this Make a Wish card, I used the Happenings Simply Created card kit for the card base and then created my tag with Scallop Tag Topper Punch. This card comes together really quick with just a couple of embellies to add a touch of pizzazz.


For the Happy Birthday card, I used the super cute Banner punch, and then added a small strip of Pool Party card stock that I embossed using the Decorative Dots embossing folder - both of which are products you can earn for free during Sale-a-bration {going on now til March 31st!}! Hope you like the the cards.


Last but not least, here's a pic of my cute little helper! He's growing up so fast and starting to talk up a storm.  We had a great time in the backyard today.  Note - no cards were harmed in this photo shoot. :)

Thanks for stopping in!  Have a great weekend.


Thursday, March 6, 2014

Sweet Sorbet Birthday


Hey there! I've got a quick share today - it's a birthday card I created for my dear mother-in-law for her bday. I got to use some fun goodies from the Sale-a-bration catalog and I also used the fancy sequins ribbon from the Occasions catalog, which I just LOVE!  Here's a look at the full card..


I'm pretty much digging the Decorative Dots embossing folder too - love those bubbles!  And of course, the banner framelits are a must have!  Here's the recipe for you:

{Sweet Sorbet Birthday}
Cardstock:
Pool Party, Whisper White
Inks: Early Espresso
Stamp Set: Something to Celebrate {retired hostess set}
Accessories: Banner framelits, Itty Bitty Shapes Punch Pack, Basic Pearls, Gold Sequin Trim
Thanks for stopping in!  Bye for now.


Tuesday, February 25, 2014

{Tech Tip Tuesday}: #6 - Foxy framelit hearts

Hello there my dear crafting friends!  I'm glad to say I'm back with {Tech Tip Tuesday} #6!  If you've put away your heart crafting products after Valentine's Day, I'm giving you a reason to take them back out and keep 'em around for your paper crafting projects year-round.  How do you like my little fox?  Other than his eyes, he's made from all hearts…isn't that sweet?  Mr. Fox is now quite in vogue again, thanks to the viral video that musician Yvlis has put together.  But I digress….now how about checking out how to make this festive little fox card?  Before we get to the quick tutorial, wanna see the inside of the card?
My friendly fox says, "hey there!"

So, let's check out the tutorial shall we?
1.  To create this Foxy card I, I used the Hearts Collection framelits, Chevron Embossing Folder, Decorative Dots Embossing Folder {from the Sale-a-bration catty}, 1/2" Circle punch, Small Heart Punch, Whisper White, Basic Black, and Poppy Parade card stock.
2.  The trick to the card is aligning the top of the heart with the folded edge of the paper just enough to keep your card together.  I tried to eyeball a width of  "2 scallops" just past the folded edge of the cardstock, on the top of each heart bump.
3.  Next step is to die cut and punch out your hearts: 1 large scalloped heart for the card base, 2 of the 2nd smallest hearts for the ears, 2 of the smallest hearts for the inside of the ears, 1 of the 3rd smallest heart for the snout, 2 half inch circles for the eyes.  One last heart not shown is for the inside of the card, which is the 2nd largest heart framelit.
4.  Emboss the card base with the Chevrons embossing folder and the snout with the decorative dots.  You can always opt to go smooth, but I find the texture to be fun and add a nice dimension to our little fox friend.  After embossing, assemble the card using the Tombow glue.  Viola, you're done!

Here's one last look at the finished card.
Isn't he a fun little fox?  Feel free to experiment with different colors and sizes.  I'd love to see what you come up with!  Hope you liked this week's {Tech Tip}!  Thanks so much for coming by to visit! 

Bye for now!


Friday, January 31, 2014

Little banner with {love}


Hi all!  Happy Friday!  Just popping in with a quick post.  Here's a fun Valentine card I created with the super cute Banner punch and Decorative Dots embossing folder from Sale-a-bration catty.  The "love" sentiment is the Expressions Thinlits die from the Holiday Catalog.  Such a fun and easy card!  Hope you have a great Friday! 


Monday, January 20, 2014

Gray Skies meet Polka Dot Parade

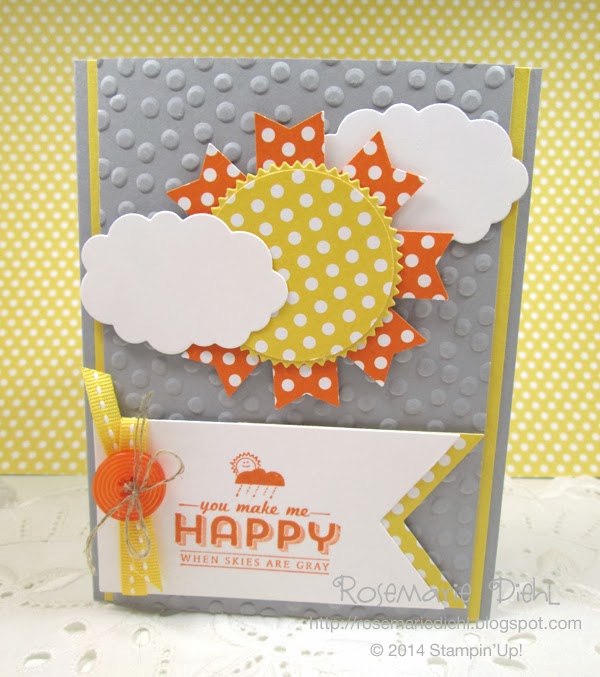
Hello and happy MLK day, blog friends!  I'm so excited to share today's card. I will shamelessly say that it's purely inspired by the cards of Jennifer Timko and Lisa Rhine. I just LOVE their creations and the sun and clouds on their cards that I had to create a card of my own!  Here's a look at my full card.
When have you every seen gray skies look so cheerful?  Aren't the clouds and sun so FUN?  I thought it was so clever to use the Word Bubble Framelits dies for the clouds.  They are just too cute!  And how about that background - do you recognize it? If you're wondering what that might be, it's a sneak peek from the Sale-a-bration catalog.  It's called Decorative Dots Embossing Folder -pretty aptly named, dontcha think? Plus, I really do love the sun in the Polka Dot Parade, too.  Dots, dots, everywhere! It just makes me smile.  Here's a look at the sun components:
I used the Banner Blast Punch {another sneak peek from Sale-a-bration!} for the rays, and the Starburst Framelits layered behind the 1 3/4" circle punch for the center of the sun. I used the Banner Framelits for the sentiment at the bottom and layered the same size frame lit with just a little peek-a-boo of the Polka Dot Parade DSP in Daffodil Delight. I am such a framelits addict! I love them all!  One last look of the full card..
Here's the recipe for you:
{Gray Skies meet Polka Dot Parade}
Cardstock: Smokey Slate, Whisper White, Daffodil Delight, Polka Dot Parade DSP

Inks: Pumpkin Pie

Accessories: Word Bubbles Framelits 
{Occasions Catalog}, Starburst Framelits {Occasions Catalog}, Banner Framelits {Occasions Catalog}, Banner Blast Punch {Sale-a-bration sneak}, 1 3/4" Circle Punch, Decorative Dots Embossing Folder {Sale-a-bration sneak}, Daffodil Delight Stitched Grosgrain ribbon, Designer Buttons, Linen Thread
Hope you like it.  Thanks for popping by today.  Have a great one!


Wednesday, January 8, 2014

The Fox says...

Hi all! Have you guys watched that viral video on "What does the fox say?"  Well, today, he's saying "Thank you so much!" Before I left for Leadership, I was determined to make Thank You cards so I could start writing them to our family and friends for all the fun holiday gifts we got (yes, I know, I'm way behind!).  Not to mention, another motivating factor was the package of goodies I got from the Occasions catalog that I couldn't wait to use!  I created the card using the Life of the Forest stamp set, the Starburst Framelits, and the Arrows Textured Impressions embossing folder. Wanna see a view of the full card?

I actually ended up doing 2 versions - the first with the twine {a sneak peek from Sale-a-bration!} and centered "Thank You"...

And a version sans the twine, which I thought would be cute for Thank Yous from our little guy. 

Either way, I was thinking simple and clean and I'm really happy with how they came out! Plus, now I have a stack of thank you cards. :)

Hope you like it!  Thanks for stopping by today.  I'll be posting more soon from Houston :)

Bey for now!


Tuesday, April 30, 2013

Stampin'Up!'s retired list is here + a sneak peek for you

Hi all!  How are you?  Hope all is going well.  Can you believe it's already that time of year that Stampin'Up! has released it's retiring stamp sets and accessories?  They are available until June 3rd, so take a look and snap up your favorites before they're gone!  Here's the full list.  Remember, these products are only going to be available while supplies last.  You can shop on my online store anytime here.

Now, are you ready to see a sneak peek of the products that will be in the NEW catalog?  I have to say, it is a gorgeous new catalog and I think you'll LOVE it.  This will be coming in June.  I've ordered some sneak peek products and am so excited they'll be coming soon. In the meantime, here's a sneak project:


Doesn't that embossing folder look so FUN!?  Well, more to come when my goodies get here!  Hope you all have a great day!


Monday, February 18, 2013

Dress Up Birthday!

 Hello all!  Happy President's Day!  I've got a fun card share today using the Dress Up framelit dies.  It's probably my current favorite die right now.  So much fun to play with and design some fun outfits!  For this particular card, I also used the lace from the Artisan Embellishments Kit.  I was inspired by dresses that I've been seeing in the fashion mags where lace is all the rage!  So, I thought I'd design my own. The ribbon belt is the seam binding ribbon in Rose Red.  It's such a great light texture and has that soft cascading look I was trying to go for.  Here's another view of the card.
To add some interest on my card border, I used the Needlepoint Border embossing folders.  The trick to do both sides of my card is that I actually started with a gray card front sized at 4 1/4 x 5 1/2."  After embossing the edges, I used the corner rounder punch on the bottom and then glued the front of the card to a Whisper White card base.  Viola!  I then layered the rest of the card with the Yellow Chevron print from the Sunshine and Sprinkles DSP, then added my dress onto the dress form, and popped it up on the card front using dimensionals.  What do you think?  Hope you like it!

Here are the products I used:
Dress Up Framelits Dies
Dress Up Framelits Dies130101
Price$24.95
Easily cut stamped dress images from the All Dressed Up Stamp Set. Largest design: 1-1/2" x 4-1/4". 3 dies. Cuts a single sheet of paper using your Big Shot, Standard Cutting Pads, and Multipurpose Platform.


Artisan Embellishments Kit
Artisan Embellishments Kit129328
Price$9.95
Random charming stuff for random creative impulses. 26 total embellishments. 2 designer tags, 4 designer ticket stubs, 18" scalloped lace, 18" cotton lace, 18" large oval lace, 1 yd. seam binding, 6 paper flowers, 1 resin heart, 2 resin flowers, 5 buttons


Needlepoint Border Textured Impressions Embossing Folders
Needlepoint Border Textured Impressions Embossing Folders129383
Price$7.95
Emboss a hand-stitched look along card edges. 2 folders: ea. 2-1/4" x 6-3/8". Embosses a single sheet of paper using your Big Shot, Multipurpose Platform, and Standard Cutting Pads.
Bring on the Cake - Clear-Mount Stamp - Clear-Mount Stamp Set - by Stampin' Up!
Bring On The Cake - Clear-Mount Stamp121958
Price$27.95
Give yourself a gift every time you use this set! You can’t beat the number and variety of birthday feel-good greetings waiting to surprise and inspire your creativity packed in this box. There are plenty of different styles for all your birthday cards fo
Set Quantity: 13

If any of these items catch your eye, you can always shop anytime at my online store here.  Thanks for stopping by today!  Have a great one!