Friday, January 31, 2014

Little banner with {love}


Hi all!  Happy Friday!  Just popping in with a quick post.  Here's a fun Valentine card I created with the super cute Banner punch and Decorative Dots embossing folder from Sale-a-bration catty.  The "love" sentiment is the Expressions Thinlits die from the Holiday Catalog.  Such a fun and easy card!  Hope you have a great Friday! 


Tuesday, January 28, 2014

{Tech Tip Tuesday}: #3 - Stamping on Muslin bags

Hi there blog friends!  Welcome to another week of {Tech Tip Tuesday}!  This week, I'm gonna share how easy it is to stamp on Muslin using Stampin'Up!'s Photopolymer stamps.  Aren't the bags above so cute?  I have to admit that I had to get over my own fears of stamping on Muslin - i.e. "Will the image come out ok?" or "Are the inks going to look dark enough?"  among other musings of mine that were preventing me from experimenting on these fun little bags sooner.  I'm pleased to share that it's really super easy to stamp on the bags and get a nice image.  Are you ready to get started?  I've got 4 easy steps for you.

1. To get started, here are the items I used: Muslin bag, Stampin'Up! Classic Ink pads in Smokey Slate and Daffodil Delight, Eye-catching Ikat Photopolymer Stamp Set, Acrylic Block.
2. For this Ikat pattern, I used 2 stamps from the Eye-Catching Ikat stamp set - the 2 diamond shaped stamps.  Place the 2 stamps on your acrylic block to create your repeating pattern.  Stamp the first row in Smokey Slate.  The beauty of the photopolymer stamp sets are that you can see the exact placement on the acrylic block and the actual stamped image on your Muslin bag.  Tip - be sure you evenly ink the stamps to ensure your full image stamps onto the Muslin.  Press the acrylic block firmly onto the bag and be sure not to rock the block back and forth for a clear and crisp image. 
3. Continue making your pattern and clean your stamps between colors. For the second row, I used Daffodil Delight.  You can stamp as many rows as you'd like to continue and repeat your pattern on the bag. For this sample, I create 3 rows.
4.  The finished bag!  As you can see, creating a pattern is a snap with the photopolymer stamps!

Here's a closer look at the trio of bags I stamped {notice the use of my rosette embellishments? - SOO fun!}:
For the rosette embellishment, I doubled up and used 2 flower dies rolled together to create a bigger bloom.

I just love this Ikat pattern and color palette! This pretty polka dot rosette was created using the Polka Dot Parade DSP.
For this stamped patter, I did a two-step stamp technique to create the yellow sunflowers.  Then, I topped it off with a happy orange felt rosette.  These Muslin bags are perfectly sized for cute little goodies or trinkets.  Hope you're inspired to create your own little gift bags. :)

Here are the supplies I used:
{Muslin Bag Trio}
Stamps: Eye-catching Ikat Photopolymer stamps
Inks: Bermuda Bay, Daffodil Delight, Pumplin Pie, Smokey Slate Classic Stampin'Up! Ink Pads
Accessories: Spiral Flower Originals Die, Mini Metallic Clothespins, Smokey Slate Chevron Ribbon, Secret Garden Framelits, Muslin Bags, Polka Dot Parade DSP 
Product recommendations for this project:


You can check these products out on my online store here.  And, don't forget - Sale-a-bration starts today!  So, what that means is, for every $50 you spend, you can choose Free product from the Sale-a-bration catalog.  Woot woot :)

Happy stamping and thanks for visiting!


Monday, January 27, 2014

Sale-A-Bration 2014 is HERE!


Hi there blog friends!  Sale-A-Bration 2014 is HERE!  It's Stampin'Up!'s annual promotion where you can earn Free product with every $50 order.

To kick off this promotion, I'm excited to host my very first Virtual Workshop!  Now, you're probably wondering, what's a virtual workshop?  Well, it's where you all can participate and submit online orders by entering this special code in the promotions section at checkout: EMS7CAYP.  
This workshop will run until Friday, Jan 31st and any orders submitted for $50 or more will be entered into a raffle to win the Banner Blast punch from the Sale-a-bration catalog!  I'll announce the winner on Sat, Feb 1st!

Here's a peek at one of the adorable card kits you can earn for free with a $50 order - the Go for Gold card kit:
This super cute kit comes with all the supplies to create 8 cards - complete with envelopes and embellishments!  Here's a closer look:

If you happen to be local to the South Bay/Los Angeles in Southern CA, I am also having a LIVE workshop this Saturday, Feb 1st!  If you're interested, please email me here and I'll be sure to send you all the deets!


Friday, January 24, 2014

A bowl full of roses

Hello there, blog friends!  How do you like my bowl full of roses?  I just love how these felt roses came out using the Spiral Flower Originals die!  They are so fun to make and they just look so adorable in person.  I wasn't going to get this die since I figured I have so many flower dies already.  Then, at leadership I saw the die in action at the new products table and while I was there, I received a super cute purple felt flower from a fellow demo.  And, just like that, I HAD to get the die. {You know the feeling, right?} These roses are so easy to assemble, too! Just roll up the flower starting from the center, and then glue closed with a dollop of hot glue and viola! Instant cuteness.  Now here's what I did for the back:
Just like the sample I received, I added a Mini Metallic Clothespin on the back so you can clip it onto cards, gift bags, purses, your hair...whatever you like, really!  Here's what one of the flowers looks like clipped to my Leadership bag…
It adds such a nice touch, don't you think?  Now, if you're a big fan of flowers, then this die is a must have.  I can't wait to make more of these roses!  You'll probably see more projects using this die in the near future!

Here's the product info for you:


Wanna make some of these flowers or check out other goodies in the Occasions catalog?  Feel free to pop by my online store whenever you like!

Thanks for visiting and have a great weekend!


Tuesday, January 21, 2014

{Tech Tip Tuesday}: Week 2 - Fabulous watercolor background

Hi all!  Happy Tuesday.  Hope your week is off to a great start.  We're having some nice warm weather here in Southern California, so I stamped this week's Tech Tip outside on MLK day {it was SOO nice to have the day off from my day job!}. It got to the high 70s in the afternoon, which is a pretty warm January for us.

For this week's Tech Tip Tuesday, I'm sharing a watercoloring technique that we got a peek at during leadership.  For my card, I used the Making a Point hostess set, which I just LOVE.  It's quite a clever and sassy little set - the sentiments crack me up. Take a look for yourself:

Doesn't the lipstick one make you chuckle? Anyway, I digress.  Back to the technique.  Watercoloring elements are so trendy right now that it's a great style to work into your every day stamping and paper crafting.  This technique in particular is such an easy and fun way of using the Stampin'Write markers and an acrylic block.  So, let's get started, shall we?
1.  You'll need an acrylic block, markers, and a water spritzer.  For my project, I used Primrose Petals and Summer Starfruit Stampin'Write markers and Stampin'Up!'s size C acrylic block.
2.  On a clean acrylic block, use your markers to color directly onto the block.  I colored the Primrose Petal on about two-thirds of the block and Summer Starfruit on the bottom third.
3.  I used the Stampin'Up! Spritzer filled with water and squirted 2 sprays onto the block until the water on the block was evenly "beaded."
4.  Next, take the block and stamp it directly onto your card stock.  I used Whisper White card stock for my project.  As you press the block down onto the card stock, you'll see that the moisture from the inks and water will mix and swirl with the colors and as you pull the block off, it will create some fun variations of color and depth.
5.  Set the card stock aside to dry for a few minutes.
6.  Once the watercolor block is dry, stamp your image onto the card stock using StazOn ink.  This ensures that the image will not bleed.  Viola!  You have your stamped image on a pretty watercolor background!

I finished off my card by mounting my stamped Whisper White card stock onto Crumb Cake.  To give my card a little texture, I added a few sequins onto the card. Just a teenie amount of bling.  I've been on a simple and clean kick lately. Adhesive tip: the Two-way Glue pen is great for sticking sequins or baker's twine on cards! 

Here's another look at my finished card.  Super quick and easy! Hope you like it. :)

And last but not least, here's the recipe for you:

{you're fabulous, watercolor}
Cardstock: Whisper White, Crumb Cake
Inks: Primrose Petal and Summer Starfruit Stampin'Write markers, Black StazOn permanent ink
Stamps: Making a Point {Stampin'Up! Occasions catalog - hostess set}
Accessories: Acrylic Block {size C}, Gold sequins {Stampin'Up! Occasions catalog}

Thank's for the visit. I would love to hear what you think about the card or technique…let me know!  Bye for now. Hope your day is fabulous.


Monday, January 20, 2014

Gray Skies meet Polka Dot Parade

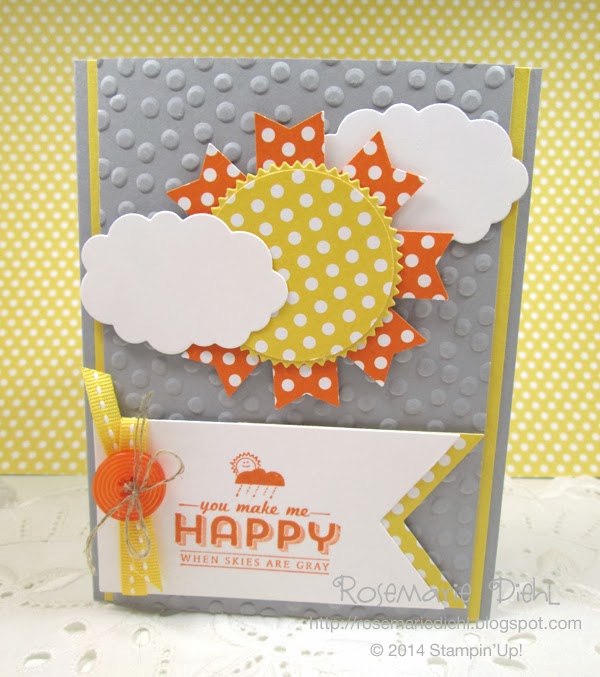
Hello and happy MLK day, blog friends!  I'm so excited to share today's card. I will shamelessly say that it's purely inspired by the cards of Jennifer Timko and Lisa Rhine. I just LOVE their creations and the sun and clouds on their cards that I had to create a card of my own!  Here's a look at my full card.
When have you every seen gray skies look so cheerful?  Aren't the clouds and sun so FUN?  I thought it was so clever to use the Word Bubble Framelits dies for the clouds.  They are just too cute!  And how about that background - do you recognize it? If you're wondering what that might be, it's a sneak peek from the Sale-a-bration catalog.  It's called Decorative Dots Embossing Folder -pretty aptly named, dontcha think? Plus, I really do love the sun in the Polka Dot Parade, too.  Dots, dots, everywhere! It just makes me smile.  Here's a look at the sun components:
I used the Banner Blast Punch {another sneak peek from Sale-a-bration!} for the rays, and the Starburst Framelits layered behind the 1 3/4" circle punch for the center of the sun. I used the Banner Framelits for the sentiment at the bottom and layered the same size frame lit with just a little peek-a-boo of the Polka Dot Parade DSP in Daffodil Delight. I am such a framelits addict! I love them all!  One last look of the full card..
Here's the recipe for you:
{Gray Skies meet Polka Dot Parade}
Cardstock: Smokey Slate, Whisper White, Daffodil Delight, Polka Dot Parade DSP

Inks: Pumpkin Pie

Accessories: Word Bubbles Framelits 
{Occasions Catalog}, Starburst Framelits {Occasions Catalog}, Banner Framelits {Occasions Catalog}, Banner Blast Punch {Sale-a-bration sneak}, 1 3/4" Circle Punch, Decorative Dots Embossing Folder {Sale-a-bration sneak}, Daffodil Delight Stitched Grosgrain ribbon, Designer Buttons, Linen Thread
Hope you like it.  Thanks for popping by today.  Have a great one!


Sunday, January 19, 2014

Paper Pumpkin Challenge


Hey there, blog friends! I just wanted to pop in real quick and share the card I had created for the My Paper Pumpkin Challenge at leadership.  The challenge was to create a card using past Paper Pumpkin stamps and current products from the Occasions catalog. I had lots of fun playing with the new Occasions products.  You can see I used the Fringe Scissors and Scallop Tag Topper punch again. :)

Don't forget there's a special Paper Pumpkin promotion going on until February 10th, so if you want to take advantage, it's not too late.  Check out my post here for more info!