Tall box:
1. Cut a 7"x10 1/2" piece of cardstock.
2. Score the long side at 2 1/2", 5", 7 1/2" and 10"
3. Score the short side at 2 1/4""
4. Fold along the score lines.
5. Cut at the 2 1/2", 5", 7 1/2", and 10" score lines up to the 2 1/4" score line.
6. At the 10" score line, cut out the 1/2" remaining tab
7. Use sticky strip along the 1/2" tab and secure your box.
8. Assemble the bottom of the box and secure with sticky strip.
lil' Frankie box:
1. Cut a 4 1/4"x10 1/2" piece of cardstock.
2. Score the long side at 2 1/2", 5", 7 1/2" and 10"
3. Score the short side at 1 1/2"
4. Fold along score lines
5. Cut at the 2 1/2", 5", 7 1/2", and 10" score lines up to the 2 1/4" score line.
6. At the 10" score line, cut out the 1/2" remaining tab
7. Use sticky strip along the 1/2" tab and secure your box.
8. Assemble the bottom of the box and secure with sticky strip.
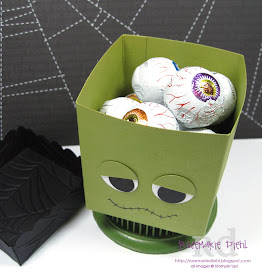
9. For the eyes, punch out two 3/4" white circles, one 3/4" circle in green (old olive), 2 1/2" circles in black
10. Draw in the mouth with black marker.
Lid - how cool is this?!
It's the Clear Scallop Square die, scored at 7/8" all the way around. So simple and fits perfectly!
Here are a few more pics of the projects for you:
I embellished my tall box with the owl punch (made into a ghost) and the bat punch. The Spooky is from the Wicked Cool stamp set.
Here's a mug shot of my young Frankenstein. He's a cutie, no?
And from the side view...he hasn't developed his ears yet...but don't you love his hair? It's styled with the Spider Web embossing folder.
Look what he's got on the inside! I think he's got his eyes on you {wink!}
Thanks for coming by for a visit! Have a great day!


These are absolutely the cutest !
ReplyDeleteI love these Rose. I will have to try them out:)
ReplyDeleteSuch a cute idea...we have a couple of little ones in our neighborhood this year--think I will try to make this cool candy boxes for them :o)
ReplyDelete