Pages

Saturday, February 28, 2015

Irresistable matchbook mints tutorial!


I'm back with the quick and easy tutorial for the Matchbook Mints.  Super simple! For the matchbook covers, I used one sheet of the Irresistably Yours DSP which I just LOVE! The pack comes all white, but by using the "resist" technique, you'll see that the prints resist the ink colors and create beautiful background papers.  Here's a look:


So first, let me start off by saying I cut the 12x12 sheet into two 4 1/2" x 12" pieces, and one 3" x 12" piece. The pic above shows 2 of the 3 pieces.  I sponged the DSP and really love how these 2 panels turned out!  Now here's a look at the 3 colors - Coastal Cabana, Calypso Coral, and Strawberry Slush -  cut into the 4 1/2" x 1 1/2" strips for the matchbox covers. Score each of these strips at 2", then you'll see there's a half inch that you fold over.  This is the flap that you'll staple with your mint in place.


Now for the 3 simple ingredients:


1) Mints, 2) cardstock, 3) stapler.


And finally, you need to put your mints in something right?  Here's my fave berry basket with the pom moms. Viola! Cute mints in a giftable or cute put-on-your-desk-at-work container, ready for displaying and giving.

For a quick summary of the steps, here's a little cheat sheet for you:


And, last but not least - here's a list of supplies for your quick reference!
Built for Free Using: My Stampin Blog


Thanks for popping by!  Hope you have fun making these. Would love for you to leave me a comment and share so I can visit your blogs!

Have a great rest of your weekend!

A basketful of Freshness


Hi blog peeps!  Hope you're having a happy Saturday so far. I have a quick share today - this cute basketful of mints! I totally cased this mint idea using the Jan Paper Pumpkin kit from Instagram friend @hofkissed. I thought it was a brilliant idea and an all occasion use of the cute kit! Just add the lifesavers and you're basically good to go.


I'm blogging on the go at the moment, but stay tuned for a full post from me later today with details and dimensions on making this project using an alternative spring theme!

In the meantime, have a great one!

Tuesday, February 24, 2015

This Week's Stampin'Up! Weekly Deals for {Feb 24} + NEW Sale-a-bration items!

Built for Free Using: My Stampin Blog


Hi blog friends! It's Tuesday, so I wanted to share this week's Weekly Deals that are available from Feb 24-Mar 2.  So many cute things for spring!

I also wanted to share that there are NEW items that will be available to earn for Sale-a-bration starting March 1!


Aren't these so cute?!  If you're interested in hosting a party at your home, or if you want to be the hostess of a virtual stamp party, send me an email and I'll be happy to schedule something for you! As always, you can check out my online store at any time. Just visit here!

Have a great day!


Saturday, February 21, 2015

Stitch Fix #2!


Hi all!  My Stitch Fix #2 finally arrived Saturday afternoon!  It was scheduled to come earlier this week, but there was a delay in delivery {as the handy tracking link showed me from my shipment confirmation}. So, as you can imagine, I've been waiting in anticipation for the last few days. I'm pleased to say, the box arrived in perfect condition.  With this fix, I even got an accessory included this month - the cute studded clutch above.  For those of you that are new to Stitch Fix, you can check out my first post to find out more. In a nutshell, it's a personal styling service that you receive at your door once a month (or at your preferred frequency). What I love about this service the most is the surprise factor. I mean, how fun is it to get a box of clothes each month? You want to see the rest of my Fix #2? I definitely would love to here your opinions.  Here's what I got in the box:


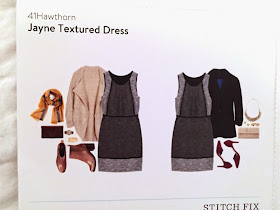
#1 - Nickolai Asymmetrical Button Jacket. I like this jacket and the material feels like a faux suede, so it's got a little bit of an edge to it.  It's comfy and can be dressed up or down, which I like. I'm a minimal fuss kinda gal. Below is the card of outfit potentials for the piece. I really do like how Stitch Fix includes this for each of the clothing items. It's nice to be able to visualize a few options to mix and match the piece with.  Verdict: Maybe.


#2 - 41Hawthorn Moni Geo Print and Camisole Blouse.  I love this top! I know it's been around from the Pinterest pins I've seen, though I think it's a classic cut and love the color for spring and summer. Verdict: Keeper.


#3 - Fun2Fun Holston Crochet Trim Solid Blouse. I love this blouse, too! It's got a pretty tulip sleeve with the crochet edging. The color is perfect for spring and summer. I am in need of tops that I can dress up or down, so this one is another one that will be a great add to my wardrobe.  Verdict: Keeper.


#4 - 41Hawthorn Jayne Textured Dress.  I like the look and cut of this dress, though the only thing I'm debating is that when I first put it on, it was on the snug side.  However as I walked around in it, the material does give a little, so I'm thinking that it will be fine. Verdict: Maybe.

So friends, what do you think?  Would love to hear from you!  Also, if you're interested in trying out StitchFix, you can use my referral link here. Stitch Fix has a great referral program where if anyone you refer uses your link and gets a fix, then they'll get $25 to use towards their next fix.  Pretty cool, right?

Anyway, as far as my items go, I have 3 days to decide what I keep and what I send back. To give you a sense of the pricing for this fix, if I get the whole kit-and-kaboodle, it'll cost me $202.50, which includes a 25% discount and an additional $20 off, since I'd be applying my non-refundable styling fee. I really think the pricing is reasonable this month. So, I'll keep you posted on what I end up keeping or sending back. Decisions, decisions.

As for my first fix, here are the two items I kept in the pic below - the black and white blouse and the moto jacket.  Really happy with them!

Thanks for coming by today!  Have a great one :)

Birthday Bonanza!

Happy Saturday!  How are you all?  Hope you're enjoying your weekend so far.  Birthday season is starting in our family, so I've got a couple birthday cards to share!  I think I'll need to build up my stash, so get ready for more bday cards coming soon :) I can't quite tell you who I created these for since the cards are still in transit, but nonetheless, aren't they so fun and festive? I had a great time playing with the Celebrate Today stamp set and the Balloon Framelit dies that coordinate so perfectly.  I dressed up the envies with the Balloon Bash stamp set. I also love that both the stamp sets I used are photopolymer, too!  Here's a closer look.

The balloon framelits come with the cutest little accent dies, like the banner, bow and tassles that I die cut in the silver glitter paper.


I'm also loving the embossing folders, which add such a nice texture to the cards!

Here's a list of all the products I used!
Built for Free Using: My Stampin Blog


Thanks for popping by today and enjoy your weekend!


Thursday, February 12, 2015

Hey, Valentine!


Hello there! How are you, friends? Well, Valentine's Day is approaching fast, so I've got a couple of fun projects to share with you today.  The first project is the one above - it's an adorable triangle treat box that was shared with us at Leadership.  This was originally created by Sam Hammond Donald, aka Pootles, and the link to her awesome tutorial is here. I made 2 of these cute little boxes for my little man's teachers.  It makes for such a sweet Valentine with the Stacked with Love paper stack! Here's another look:


The next Valentine idea was a ton of fun to put together..primarily because I got to stamp with my son to create his Valentine's cards for his preschool class! I have to say it warmed my heart to see him stamp.  He was just too darn cute and he really did enjoy doing it!  


As you can see, he even got to use the Big Shot!  That was probably his favorite. He loved to turn the crank! Do you want to see the finished product? 


Aren't these cute?  I am such a big fan of the "Hey Valentine" stamp set! I used the fish image as well as the cute fox #1 Valentine image for the teacher tag. For the Valentine treats for his school friends, I filled them with these mini play packs that all come prepackaged with a small coloring book, 2 crayons, and a sticker.  I have to admit that I did color in the little fish on the cover, but I made it fuss free for the kiddos by stapling the Valentine to the front and just dropped in the play pack without  using any ribbon or string.

Well, my friends, hope you liked these! Would love to hear what you think!  I'll catch up with you all soon.  Have a great one!

Tuesday, February 3, 2015

Highlights from Stampin'Up! Leadership 2015

Hi all! Boy was this year's Stampin'Up! Leadership conference a whirlwind! I totally intended to blog onsite, but I had some technical difficulties with my computer (slow wi-fi) and also didn't get a chance to download and transfer all my pics from my camera and iPhone to my computer, that I'm just now getting around to doing it!  Pictured above is the roommate gift I made for my dear roomie, Norma. I used goodies from the Sale-a-bration and Occasions catalogs to decorate this cute mini printer tray. 

If you're on Instagram, you can check out my quick posts @stampdiehler as well, but I've put together some highlights for you here as well...


It's always exciting to get into the spirit of things upon arrival when you see Stampin'Up! on the convention center signs!


Here's this year's Leadership bag.  I love that it says "Best. Day.Ever." What a fun sentiment.  Makes you want to make the most of each day. :)


Here's a peek at one of many great ideas we got at leadership - this little envelope treat holds a cookie.  Now, how cute is this packaging! Between the classes we attended and the samples on display, I've become rejuvenated with a ton of projects that I can't wait to try out!


Oh, and of course, we got our fair share of giveaways. Here's lucky Louise with her prize patrol giveaway.  Have to say I was a teenie bit jealous for not winning this fun bundle!


We also got to play in the "Product Playground." Tons of fun.  They had the bouquet kit on display and while I had ordered the kit for myself, I hadn't put it together yet, so it was awesome to see first hand how simple it was to put the flowers together! I made the blue flower in the bottom right. Didn't that come out so pretty?!


The Paper Pumpkin area was a lot of fun. We got a sneak peek of the upcoming kits and they don't disappoint. You will definitely be delighted!  In case you're not familiar, Paper Pumpkin is a monthly subscription where you get a new craft project, complete with all the supplies needed, delivered to your door.  Sound appealing?  You can check out more info about Paper Pumpkin here


In typical Stampin'Up! style {thanks, SU!}, we had several all-group giveaways at Leadership, so no one gets left out! Here, Michelle and Norma proudly display the pack of the Birthday Bash DSP we received. How yummy is that!


Here's a look at the rest of us! Norma, me, Louise and Terry, among all the other demonstrators at the session. Fun times!

Thanks for popping by today! I'll be posting more fun ideas for Sale-a-bration and the Occasions catalog, so come and visit soon! Toodles for now!