Just wanted to wish you all a wonderful holiday with your family and friends!
HAPPY THANKSGIVING!!
Pages
▼
Thursday, November 27, 2008
Wednesday, November 26, 2008
Get Ready for Thanksgiving!
This year, we're going to my parent's house for Thanksgiving. While we don't need to make the turkey, we're gonna be bringing some side dishes. Michael's gonna be making potatoes, and I'm going to be making salad and pumpkin bread, so we'll be pretty busy today to get things ready for tomorrow. But on top of it all, I wanted to make my mom a little table decoration as well. Here's a little pumpkin made out of strips of pumpkin pie cardstock. I used the Autumn Fest (retired) stamp set to create the leaf and decorate the Thanksgiving tag:
Here are the directions to create this fun little table decor:
1. Cut one 8 1/2x11" cardstock sheet into 1 inch strips
2. Punch a hole on both ends of the strip. I used the Crop-a-dile.
3. String a 12" strip of ribbon through the holes and knot the ends at your desired width of the pumpkin and trim the excess, but leave a little bit of a stump on the top.
4. Now, take each of the paper strips and spread them out to create your "pumpkin"
5. Embellish with another piece of ribbon and add tag and leaf
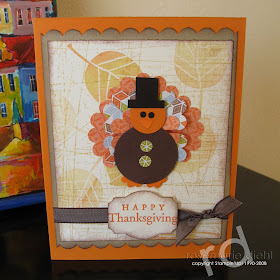
I thought I'd share another sample with you just to spread the Thanksgiving cheer! Here's one of the Thanksgiving cards I made. Since there aren't many trees that change color in CA, I wanted to create the feel of falling leaves on the card. I used the Top Note die cut and then used the Sanded background stamp to add some texture. I really love the Autumn Fest stamp set and I'm sad that it's retired, but glad that I have it to make my card!
Have a great Thanksgiving Eve! Tomorrow, I'll post another card - my favorite Thanksgiving card I made :)
Oh - don't forget! The Holiday Extravaganza Sale starts today on my Stampin'Up! Website! Make sure to check out the deals on this flyer. While you're at it, here are a few gift ideas for you to consider. Why wait til Black Friday, when you can shop now right on your own computer (in between prepping for Thanksgiving, of course)! Have fun!
Tuesday, November 25, 2008
Dressing up my bluetooth
Now that we're required to use an ear piece while driving in California, my bluetooth ear piece has become one of my more regular daily accessories. Since my husband and I have the same one, I thought I would decorate mine so we could tell who's was who's. So here's what I did:
I thought it was a fun use of rub ons and it did the job in making mine stand out from my husband's :) I'm trying to figure out what else I can decorate with my rub ons!
Monday, November 24, 2008
Decor Elements Ideas
Hope you all had a good weekend! It's finally cooling down and feeling like fall in Southern California - yay! I'm ready for a change in season, even if it is just a minor change :) Today I thought I'd post a couple of pictures using the decor elements. Here's a picture of the Lollipop flowers decor elements in my niece's room - doesn't that look so sweet!?
Here's an idea to decorate a serving tray - I thought it added a nice touch!
The decor elements are really easy to use and a fun and relatively inexpensive way to add some flair to your home decor.
I wanted to also tell you a quick note about the Online Stampin' Up! sale on my demonstrator website starting this Wednesday, November 26th til December 1st! While us demonstrators don't even have the complete details yet, Stampin' Up! did tell us that there will be bundles offered at 20%-50% off, so it'll definitely be worthwhile to check out if there's something you wanted to get or if you're planning on getting gifts for the crafters in your life :) I'll update you as we find out more info. Meanwhile, have a fantastic day!
Saturday, November 22, 2008
Holiday Rub Ons
I was so excited to get my Stampin' Up! package yesterday with the Holiday Rub Ons! Here's a little notebook I covered and embellished with the Season of Cheer Rub Ons. This makes a cute little gift to give a family member or friend, or even keep for yourself...just in time to do holiday shopping!
I also wanted to include a picture of how I made the dog ears in yesterday's Top Dawg card. I used the 1 3/4" circle punch and a top note card:
Friday, November 21, 2008
What's up dawg?
After I created my Oliver the cat card, I got some great comments and requests for a dog version using the Top Note Bigz Die Cut. So I decided to give it a whirl, and this is what I came up with:
Isn't he cute? He's loosely inspired by a friend's dog mixed with a teenie touch of ScoobieDoo. Have a great weekend!
Thursday, November 20, 2008
Sneak peak of the Bonus Project for Nov 30th
Do you wanna see a part of the surprise bonus project for my Nov 30th class? Here's a quick look, in keeping with the gift tags theme. A big thanks to Corey Urey! She inspired this tag idea from the gift tags she showcased at the Demonstrator Holiday Party this past weekend.
I'll give instructions on these tags and the rest of the bonus project on December 1st. Have a great day!
Wednesday, November 19, 2008
My Shoebox Swap
Tuesday, November 18, 2008
Pictures from the Holiday Party
Here are a few pictures from Michelle Halleen's West Coast WooHoo Stamper's Holiday Party at Robin's house. Michelle is my upline at Stampin'Up! and she now lives in the East Coast. Even though she's long distance, she has a great group of demos on the West Coast, and when I can, I try and attend the meetings. It's a little ways away for me, but always worthwhile to go! The Holiday Party is a really fun event to attend - the samples, gift exchange items and projects were all just so fantastic! All the demonstrators in the group are incredibly creative and talented. When you see the pictures, you'll see why I felt even more inspired to stamp for the holidays! I got some great ideas for my Christmas card :)
To see a larger view, click on the screen below to open it up in a new window. Hope you enjoy!
We did take a group shot, but I don't have a copy of that on my camera. When I get it, I'll definitely post it :)
To see a larger view, click on the screen below to open it up in a new window. Hope you enjoy!
We did take a group shot, but I don't have a copy of that on my camera. When I get it, I'll definitely post it :)
Monday, November 17, 2008
Happy Monday!
Today, I thought I'd start the week off sharing my holiday gift exchange contribution that I made for our Demonstrator Holiday Party yesterday.
This is the tote I made, inspired by Andrea Walford's tote. She does a fantastic tutorial!
Here is the front of the ornament I made using a small glass topped tin. My goal was to make a mini diorama, so the tree, the snow, and reindeer are all separate layers.
On the back is the snowman, just so the back woundn't be boring..but it also makes it a reversible ornament!
The party was fun yesterday - everyone brought such great creative gifts and we did lots of stamping. I will post more pictures tomorrow, so come back and check it out :)
Sunday, November 16, 2008
Scalloped Gift Card Envelopes
I wanted to try out these cute little scalloped gift card envelopes that Patty Bennett created on her blog. Here are the ones I made in a Thanksgiving/Fall colored theme:
Then, I was on a roll and wanted to experiment with the Top Note die, and here's what I came up with:
I think these are totally fun and super easy to make!They're great gift card (or money) holder options for the holidays!
I'm going to our Demonstrator Holiday Party later today, so I'm sure I'll have a lot of great ideas to share with you tomorrow!
Saturday, November 15, 2008
Oliver the Cat!
Meet our kitty, Oliver. It's one year this November since we adopted him at the Point Vicente Animal Hospital. He was just a little guy at 3.5 lbs...and now at he's grown to an almost 14 lb cat! Believe it or not, I was an anti-cat person at first. It took me a while to come around, but now that I have, I must admit that cats are pretty fun. I tell everyone that Oliver's like a dog-cat, because he loves to fetch! Sure, he's sleeping in this picture, but when he's awake, he's about as dog-like as a cat can be. So anyway, I was especially inspired today to create his portrait using punches. The card below is what I came up with:
Can you see a resemblance?
Friday, November 14, 2008
Whoooo likes Owls?
Here's a fun card I created based on the inspiration I got from the many owl samples on the Splitcoaststampers gallery. I used the Top Note and Scallops #2 big shot die templates, and scallop, circle, and oval punches to make these cheerful owls.
I made this bag and card for my friend Cathy's birthday. Isn't the pinwheel flower on the bag fun? This was created using the tag punch. I used the Crazy for Cupcakes stamp set for the card and again used the Top Note die to make the frame for the cupcakes.
Tuesday, November 11, 2008
Holiday Gift Tags Class preview
Here's the Gift Tags and Box set I'm doing for my November 30th Holiday Stamping Class. I'm also offering it as a kit as well for my far away stamping friends that want a "virtual" class. Afterall, you can't have too many tags for the holidays! I've had so much fun catching up on my stamping lately. Now I need to get back into my jewelry as well :) Hopefully, I'll be able to make a few items and post them soon!
Tuesday, November 4, 2008
My Holiday Extravaganza Class!
This past weekend, I held a Holiday Stamping class where we made 5 projects to get ready for Thanksgiving and Christmas. We used punches, die cuts and stamps to create these fun projects:
We made the Santas with the big shot Stampin'Up! exclusive Penant Die Cut and also used the coluzzle to make the circle for his face. I love the little Turkey card, which was created entirely using punches. I would love to say that I masterminded both these projects, but they were actually brilliant ideas from Stampin'Up!
The cute little basket is also a Stampin'Up! exclusive die cut called Baskets and Blooms. Die cut crafting is fairly new to me, but I am definitely enjoying all the fun possibilities you can create with them.